
 Distribution PL · 4REF
Wipcool P12 user manual
Read the entire manual before first use. Keep it for as long as you use the device.
Wipcool P12 user manual
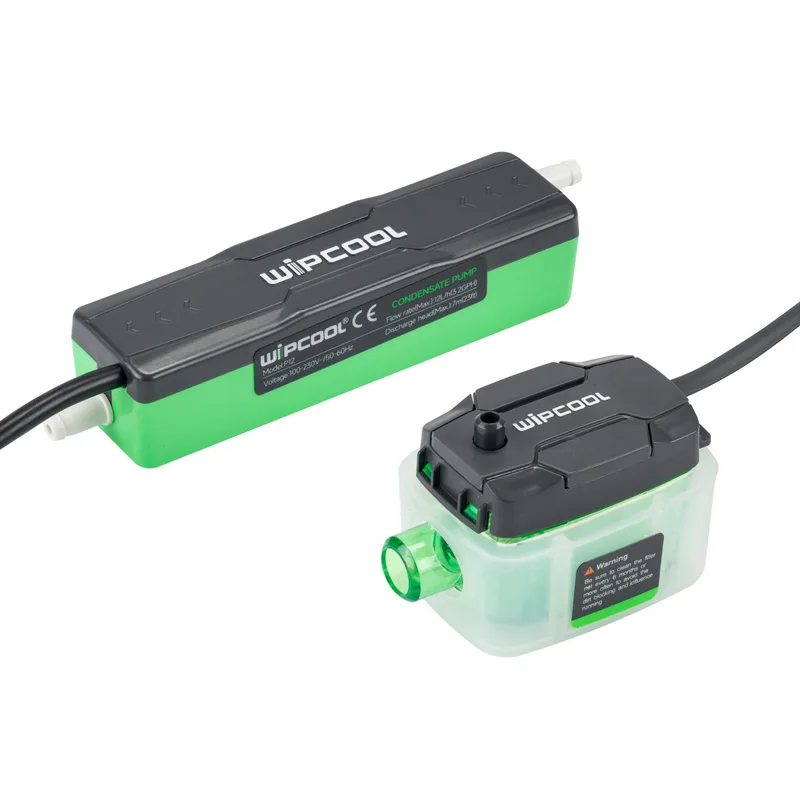
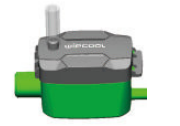
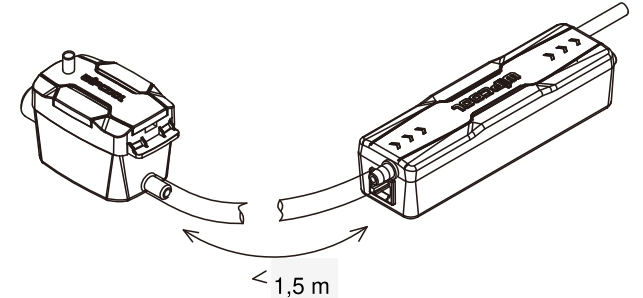
The Wipcool P12 Condensate Pump is designed to remove condensate from air conditioners. It consists of a separate tank with a level sensor and a pump body.
The user manual is an integral part of the product. Please read this manual carefully and follow all instructions strictly.
General information
Wipcool products are designed for professional use by qualified air conditioning and refrigeration technicians. As the manufacturer, Wipcool stipulates that our equipment should only be operated by suitably qualified and trained personnel.
- ■Comply with all local safety regulations and general safety standards when using the Wipcool P12 Condensate Pump.
- ■The user manual should be kept near the device so that personnel can easily access it at any time.
- ■Before use, qualified personnel should read the user manual carefully and understand all the instructions it contains.
- ■The manufacturer accepts no liability for any damage resulting from improper use, failure to follow the user manual, lack of personnel qualifications or any unauthorised modifications to the device.
- ■The general terms of sale contained in the sales documents apply.
Symbols and conventions
Symbols and markings used on the device and in the manual:
- 01
 Warning - read the text in the box next to the symbol.
- 02
 Dangerous voltage - risk of electric shock.
- 03
 Notice - risk of damage to the device or incorrect operation.
- 04
 Before starting work, read all safety and installation instructions carefully.
- 05
 Indicates that the product meets the health, safety and environmental standards applicable in the European Union.
- 06RoHSThe product meets the requirements for restricting the use of hazardous substances.
- 07
 Do not dispose of the pump with household waste.
Safety information
- ■Do not install a damaged pump.
- ■The pump is not waterproof. Do not install it outdoors or where it may be flooded.
- ■Do not place electrical equipment or valuable items beneath the pump. A power failure or leak may cause damage.
- ■Coil any excess power and alarm cable so that it is not damaged during installation.
- ■Secure all water hose connections with cable ties. Avoid unnecessary hose connections using couplings.
- ■Remove any chemical residue from the evaporator fins before restarting the air conditioner.
Technical specifications
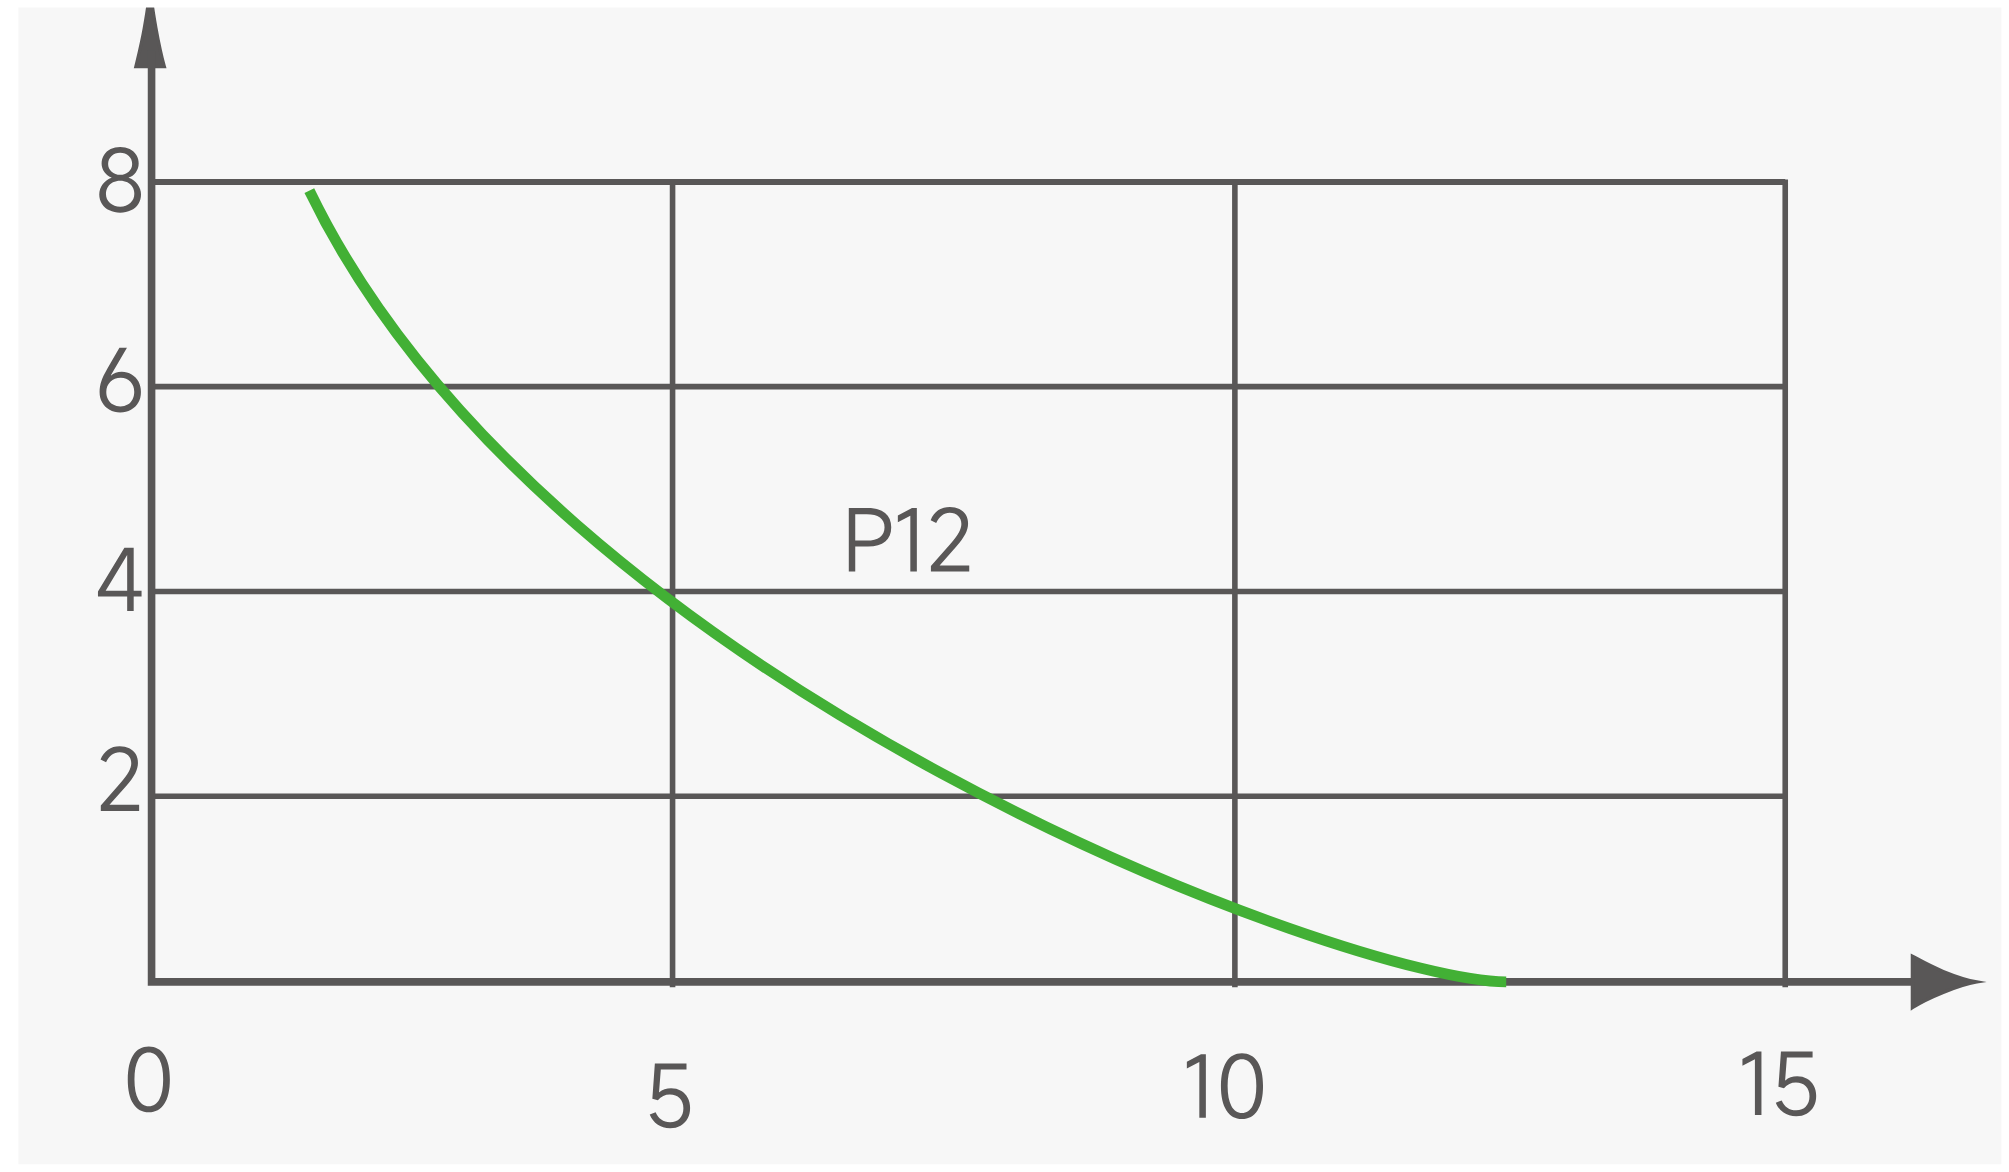
Performance
Device diagram
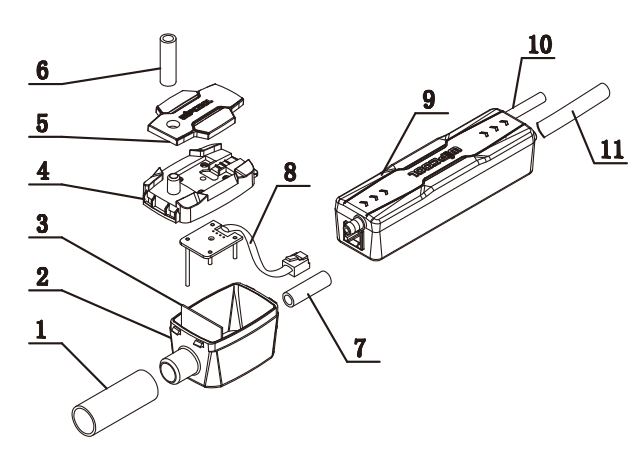
| No. | Name |
|---|---|
| 1 | Inlet hose |
| 2 | Tank |
| 3 | Filter |
| 4 | Tank lid |
| 5 | Lid cover |
| 6 | Vent tube (6 mm diameter) |
| 7 | Suction hose |
| 8 | Level sensor signal cable |
| 9 | Pump body |
| 10 | Power and alarm cable |
| 11 | Discharge hose |
Pump dimensions
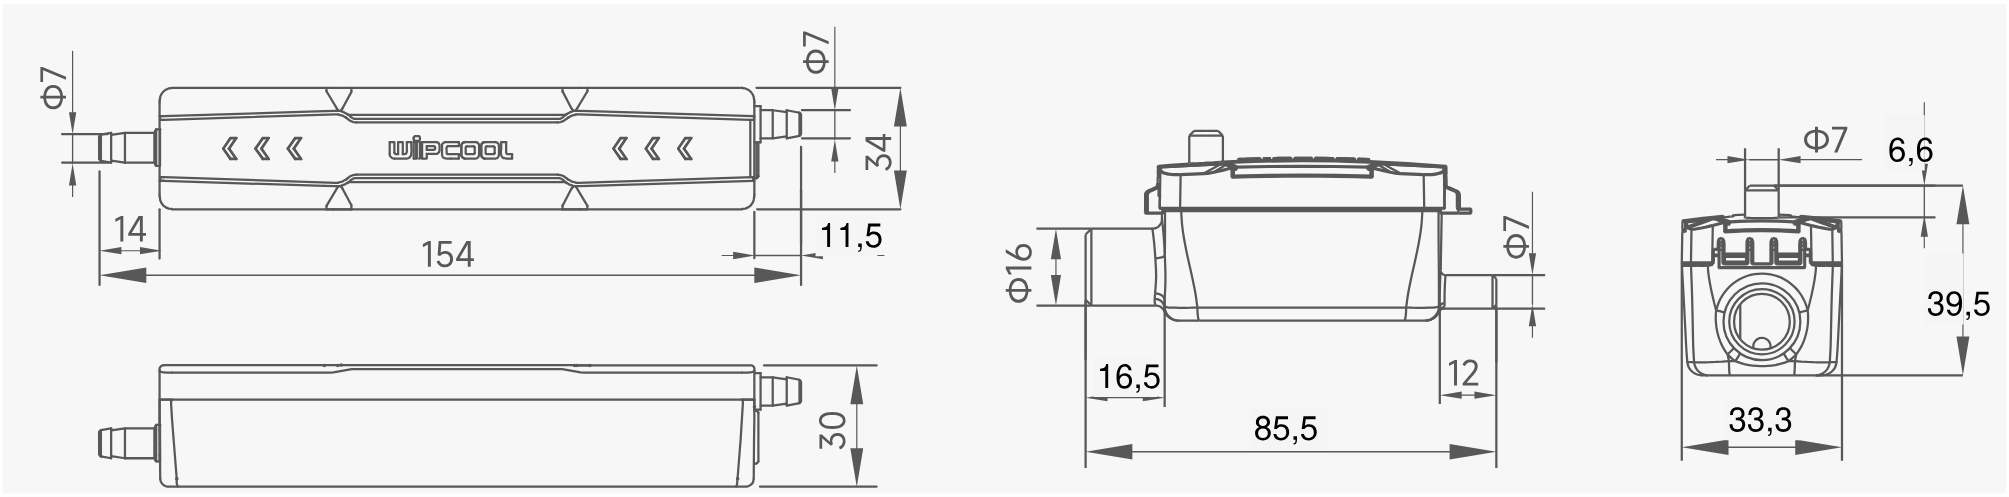
Contents
After unpacking, check that the kit is complete and in good condition. Report any missing or damaged items to the seller.
- ■Pump body with tank, filter, inlet hose, vent tube, suction hose and level sensor signal cable.
- ■Cable ties: 4 pcs, 30 cm long and 2 pcs, 10 cm long.
- ■6 mm couplings: 2 pcs.
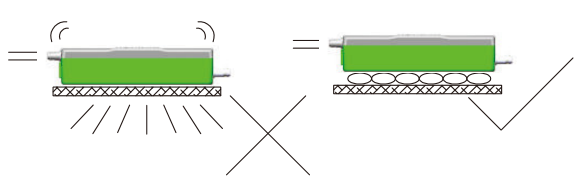
- ■Adhesive mounting pads for the pump body and tank: 2 pcs.
- ■25 × 16 mm rubber reducer.
- ■16 mm rubber elbow connector.
- ■Power and alarm cable.
The 6 × 9 mm discharge hose is not included in the kit.
Transport and storage
Transport
- ■Transport the pump in its original packaging. Do not throw it, and protect it from shocks and excessive vibration.
- ■Protect the device from moisture, dust and extreme temperatures. Secure the packaging against movement during transport.
Storage
Store the pump horizontally in a dry, well-ventilated place at 5–50 °C, away from direct sunlight and heat sources.
Application
The pump is designed to remove condensate from split system, ducted and cassette air conditioners.
Installation
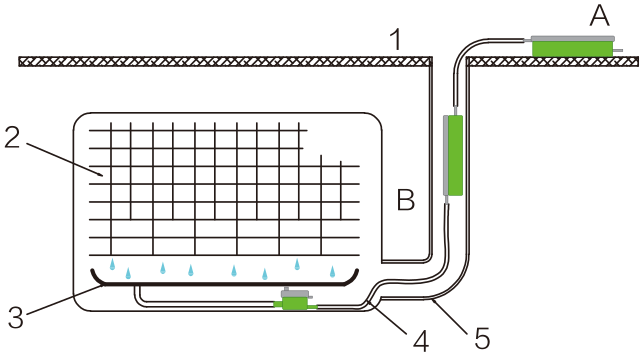
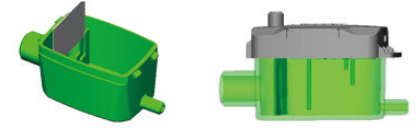
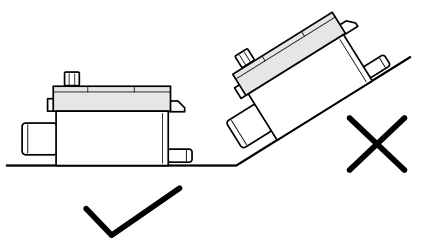
Connection
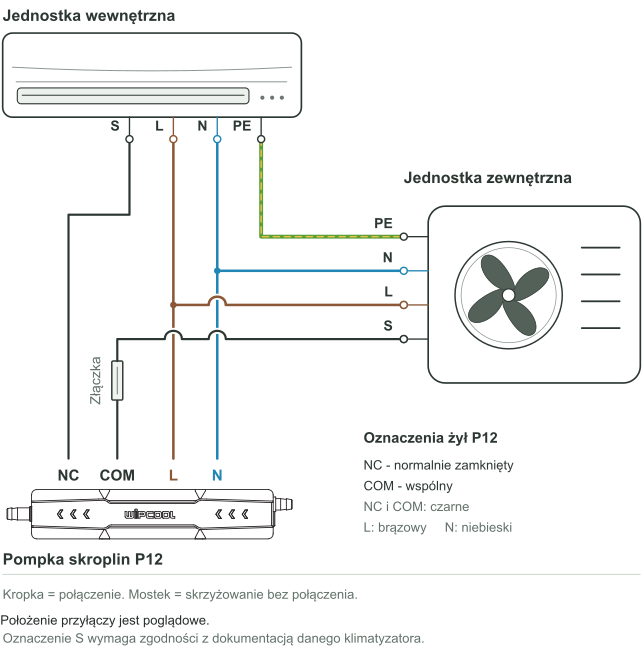
The pump requires an independent, permanent power supply. After the air conditioner stops, leave the pump power supply switched on so that it can pump out the remaining condensate.
| Marking | Function | Conductor colour |
|---|---|---|
| L | Live conductor | Brown |
| N | Neutral conductor | Blue |
| NC | Normally closed contact | Black |
| COM | Common contact | Black |
Connect the COM and NC alarm contacts to the circuit that stops the air conditioner when the condensate level is high. If the air conditioner has a liquid level control input, connect the COM and NC contacts to it. If it has no such input, the air conditioner power supply can be controlled through a contactor, or another alarm device can be connected. The connection must comply with the documentation for the air conditioner concerned.
Use
Operational test
- 01After completing installation and electrical connection, switch on the pump power supply.
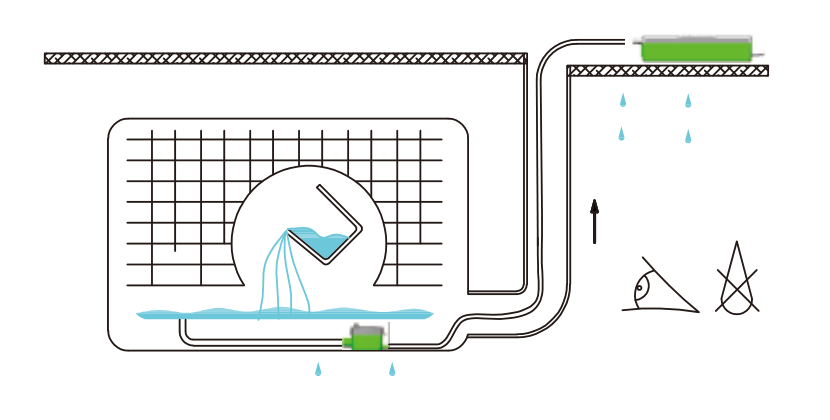
- 02Pour water into the condensate tray. Check the tray and connections for leaks and check that the pump removes the water.
Maintenance
Check and clean the pump before the cooling season. Remove deposits from inside the tank and from the surface of the level sensor. Check that the inlet and outlet are clear.
Troubleshooting
| Problem | Possible cause | Solution |
|---|---|---|
| Pump runs continuously | Tank is tilted | Level the tank. |
| Pump runs continuously | Deposits in the tank or on the level sensor | Clean the inside of the tank and the surface of the level sensor. |
| Pump does not run | No power supply | Check the power supply connection. |
| Pump does not run | Incorrect voltage | Check that the supply voltage meets the pump requirements. |
| Pump does not run | Incorrect wiring | Check the connections of the L and N power supply conductors. |
| Pump does not run | Tank is tilted | Level the tank and check the water level. |
| Pump runs but does not remove water | Blocked inlet or outlet | Check and clean the inlet and outlet. |
| Pump runs but does not remove water | Incorrect tank position | Position the tank horizontally. |
| Water leaks | Damaged discharge hose | Check the discharge hose and replace it if damaged. |
| Water leaks | Incorrect discharge hose connection | Check the discharge hose connection and secure it. |
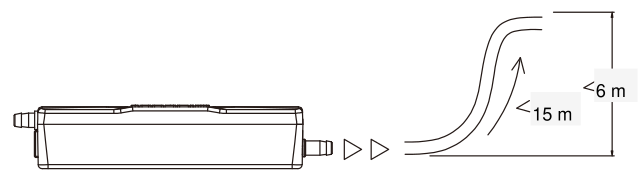
| Pump gurgles or makes noise after switching off | The end of the discharge hose is lower than the pump, causing a siphoning effect | Route the hose so that its end is higher than the pump. |
| Noisy pump operation | Damage to internal components | Arrange for repair by the service team - submit a request at wipcool.pl/serwis. |
| Pump switches on and off too frequently | Incorrect tank position | Check the operation of the level sensor and level the tank. |
| Alarm activates | Condensate level too high | Check that the pump inlet is not blocked and that condensate is draining properly. |
| Alarm activates | Incorrect alarm connection | Check the connections of the COM and NC alarm contact conductors. |
Waste electrical and electronic equipment
- 01The crossed-out bin symbol means that the device must not be disposed of with other waste at the end of its life.
Under the applicable regulations on waste electrical and electronic equipment, products marked with the separate collection symbol must not be disposed of with other municipal waste. Because they contain harmful substances, electronic products that are not sorted separately may be hazardous to the environment and human health. Proper separate collection of waste electrical and electronic equipment prevents adverse effects on the environment.
By taking waste equipment to a collection point, the user contributes to its reuse, recycling and recovery.
Recycling - a method of protecting the environment. The process of recovering substances from waste that can be reused as raw materials.
Waste recovery - the use (also commonly understood as destruction) of waste that has lost its useful value, such as plastics, paper and cardboard, as secondary raw materials.
Information on the waste electrical and electronic equipment collection system
- ■Waste electrical and electronic equipment must not be disposed of with other waste.
- ■The collection of incomplete electrical and electronic equipment and parts from waste equipment is prohibited.
- ■A distributor delivering equipment intended for households to a purchaser is obliged to collect waste equipment from households free of charge at the place of delivery, provided that the waste equipment is of the same type and performs the same function as the equipment delivered.
- ■The user may hand over waste equipment to a waste equipment collector, a treatment facility or a municipal waste collector in the municipality.
- ■Information on collection points is available on the BIP websites of regional marshal offices and city and municipal offices.
Service and documents
Before submitting a request, prepare:
- ■Model - shown on the device rating plate and on the invoice.
- ■Serial number - if there is none, provide the production number (e.g. 11/2025), usually found on the underside of the device.
- ■Proof of purchase - an invoice or receipt from an authorised distributor.
- ■Description of the fault - what is happening, when it started and under what conditions.
Submit a service request at wipcool.pl/serwis. You will also find the warranty terms there.