
 Distribution PL · 4REF
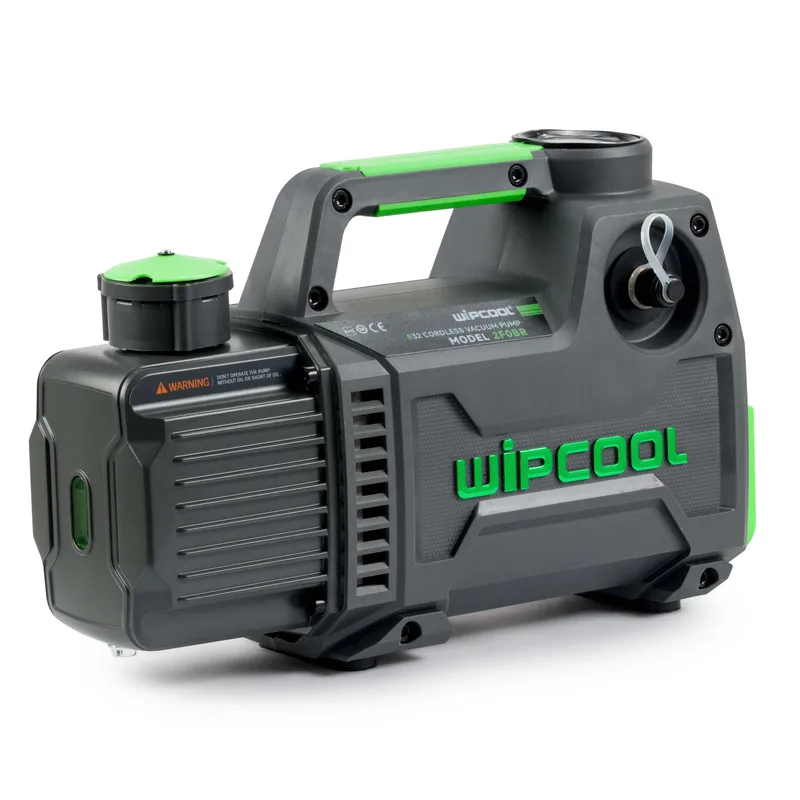
Wipcool 2F0BR / 2F1BR / 2F2BR user manual
The Wipcool 2F0BR, 2F1BR and 2F2BR two-stage vacuum pumps are designed to create a vacuum in closed systems. They are rotary vane pumps powered by an 18 V battery.
The user manual is an integral part of the product. Please read this manual carefully and follow all instructions strictly.
General information
Wipcool products are designed for professional use by qualified air conditioning and refrigeration engineers. As the manufacturer, Wipcool stipulates that our equipment should only be operated by suitably qualified and trained personnel.
- ■Observe all local safety regulations and general safety standards when using the Wipcool 2F0BR / 2F1BR / 2F2BR vacuum pump.
- ■The user manual should be kept near the device so that personnel can access it easily at any time.
- ■Before use, qualified personnel should read the user manual carefully and understand all the instructions it contains.
- ■The manufacturer accepts no liability for any damage resulting from improper use, failure to follow the user manual, lack of personnel qualifications or any unauthorised modifications to the device.
- ■The general terms and conditions of sale contained in the sales documents apply.
Symbols and conventions
Symbols and markings used on the device and in the manual:
- 01
 Warning - read the text in the box next to the symbol.
- 02
 Dangerous voltage - risk of electric shock.
- 03
 Warning of a fire or explosion hazard.
- 04
 Notice - risk of damage to the device or an incorrect operating result.
- 05
 Indicates that the product meets the health, safety and environmental standards applicable in the European Union.
- 06
 Do not dispose of the pump with household waste.
Safety information
- ■Use original accessories from the manufacturer.
- ■Protect the battery socket from impacts and mechanical loads. Do not use the pump if the socket is damaged.
- ■Operate at an ambient temperature of 0 °C to 50 °C. The temperature of the gas drawn in must not exceed 80 °C.
Technical specifications
| Parameter | 2F0BR | 2F1BR | 2F2BR |
|---|---|---|---|
| Power supply | 18 V DC | 18 V DC | 18 V DC |
| Battery socket | AEG/RIDGID 18 V | AEG/RIDGID 18 V | AEG/RIDGID 18 V |
| Ultimate vacuum | 15 microns (0.02 mbar) | 15 microns (0.02 mbar) | 15 microns (0.02 mbar) |
| Maximum flow rate | 42 l/min | 71 l/min | 142 l/min |
| Power | approx. 190 W | approx. 190 W | approx. 370 W |
| Oil capacity | 280 ml | 280 ml | 450 ml |
| Device weight | 4.5 kg | 4.5 kg | 7.5 kg |
| Dimensions (L × W × H) | 309 × 113 × 198 mm | 309 × 113 × 198 mm | 339 × 130 × 225 mm |
| Reference runtime with a 4.0 Ah battery | 45 min | 45 min | 40 min |
| Operating temperature | 0–50 °C | 0–50 °C | 0–50 °C |
| Maximum inlet gas temperature | 80 °C | 80 °C | 80 °C |
Device diagram
The pump has a vacuum gauge on top of the housing, an oil sight glass, a switch and a built-in solenoid valve. A tank protection device limits oil leakage if the pump is tilted. The oil filler cap also serves as an exhaust and limits oil discharge.
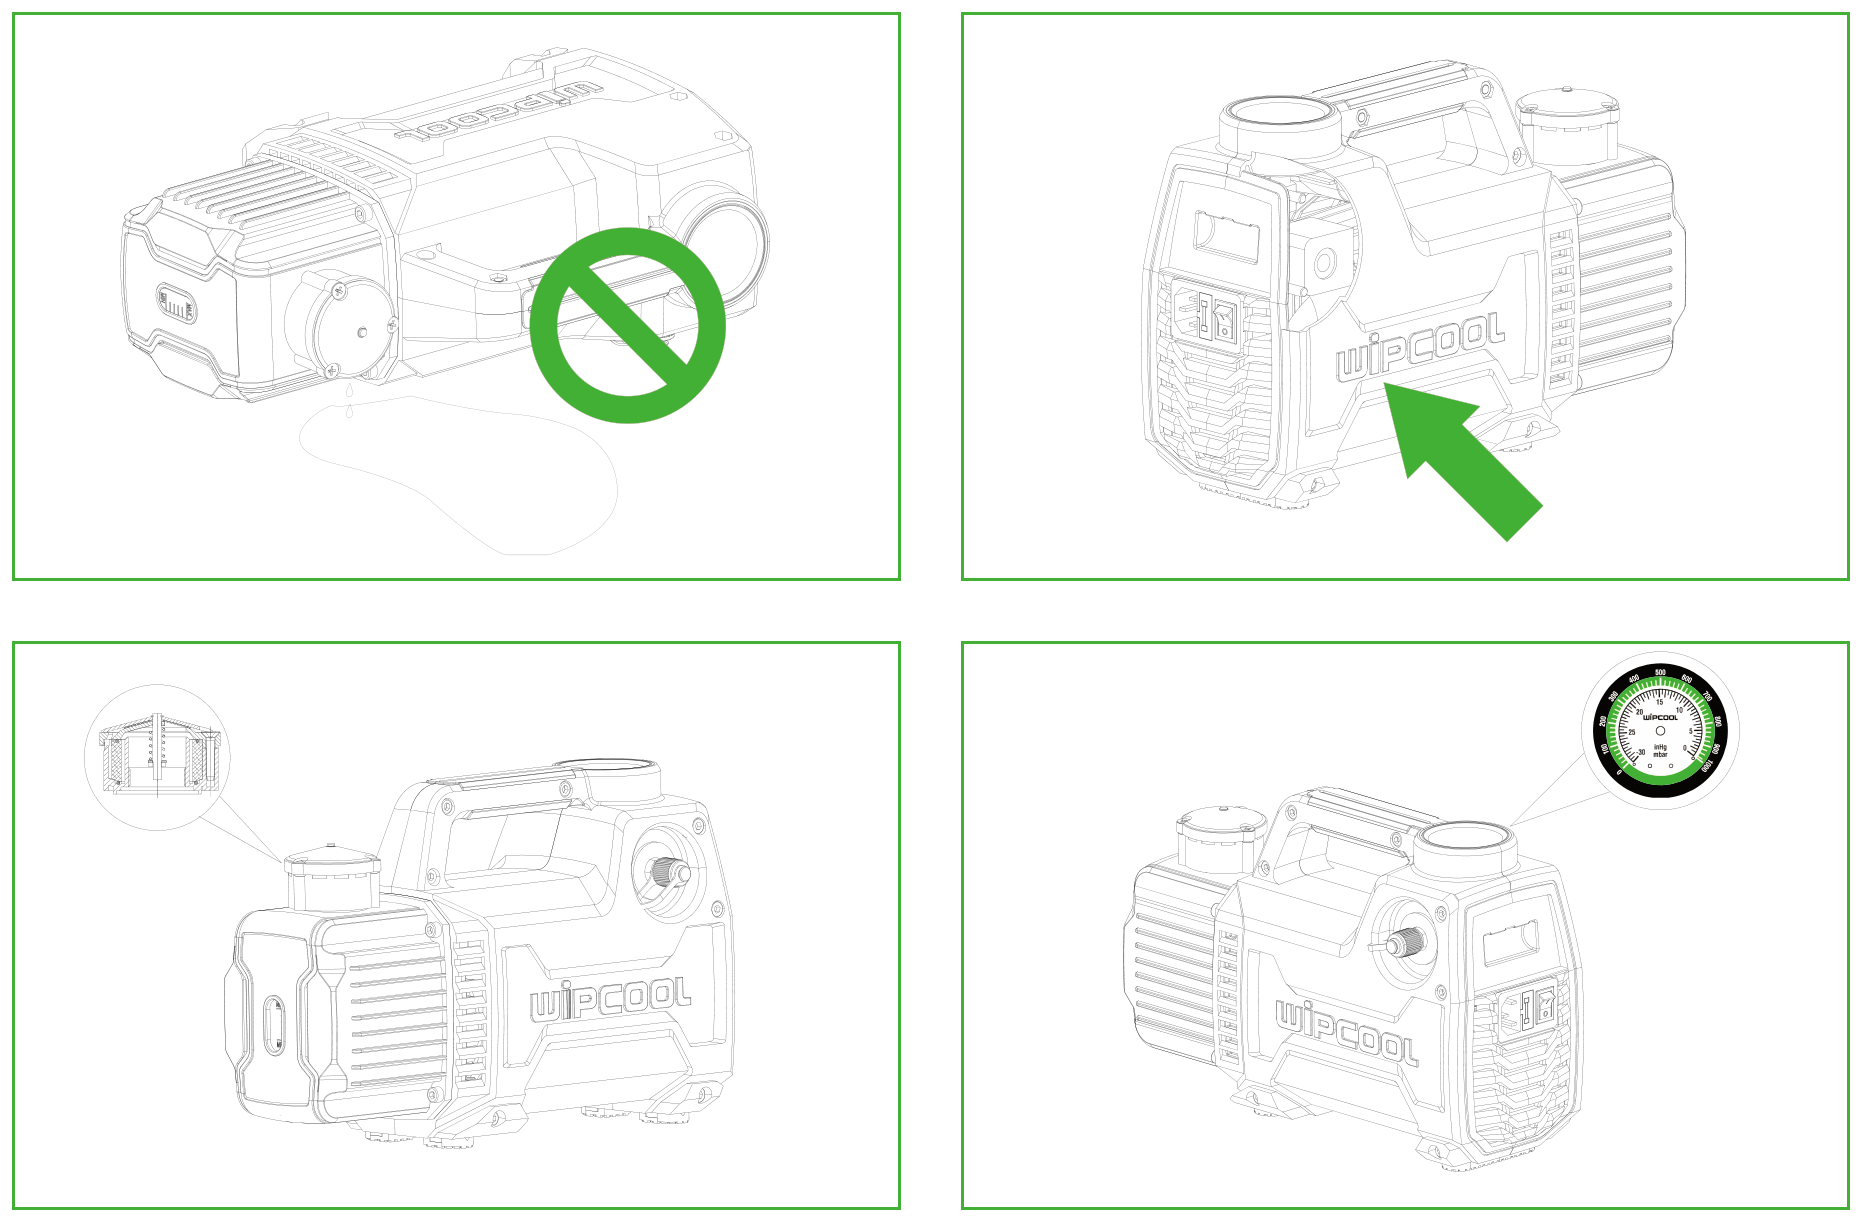
The battery socket is at the rear of the pump. AEG/RIDGID 18 V batteries fit without an adapter.
Package contents
- ■Vacuum pump.
- ■Oil filler cap.
The battery is sold separately. Adapters for other battery systems are available separately.
A vacuum hose is required for operation.
Transport and storage
- ■Protect the pump from moisture and impacts.
- ■Observe the orientation markings on the packaging.
Application
The pumps are designed to evacuate refrigeration systems containing R12, R22, R134a, R410A and mildly flammable A2L refrigerants such as R32 and R1234yf. All three models have a non-sparking design.
The pumps can also be used in other high-vacuum systems, such as printing equipment, medical instruments, vacuum packaging, gas analysis and thermoplastic forming.
How to use
Pre-operation check
Check the condition of the pump and accessories and check the packaging for oil leaks. Report any transport damage or missing items to the seller. Before each use, check the oil level in the oil sight glass.
Preparation and start-up
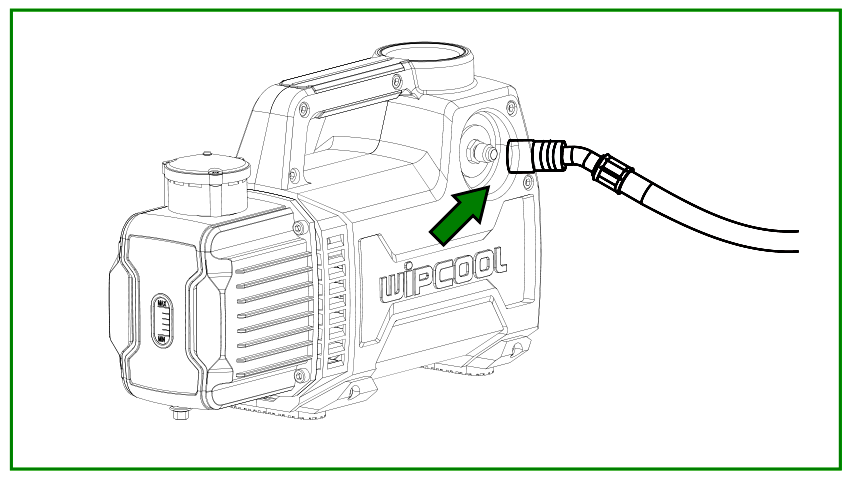
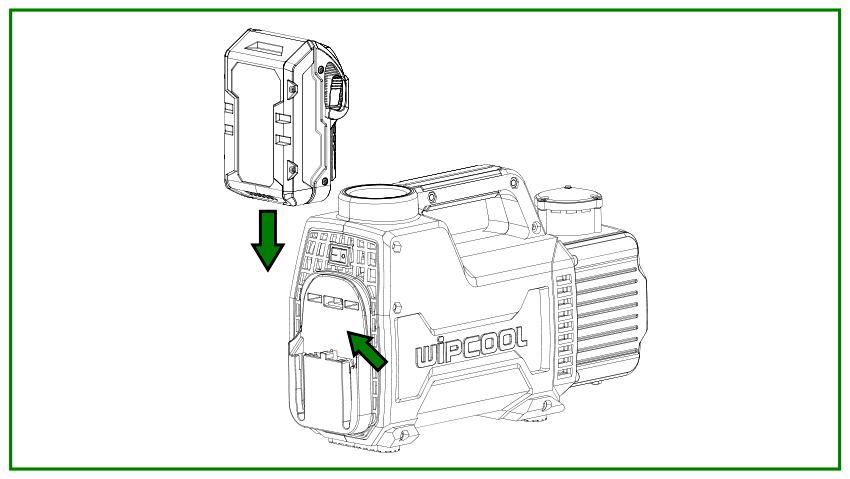
Maintenance
Oil check
Replace the oil when it is contaminated, brown, black or starts to foam.
Changing the oil
- 01Unscrew the drain screw underneath the oil reservoir, drain the oil and tighten the screw.
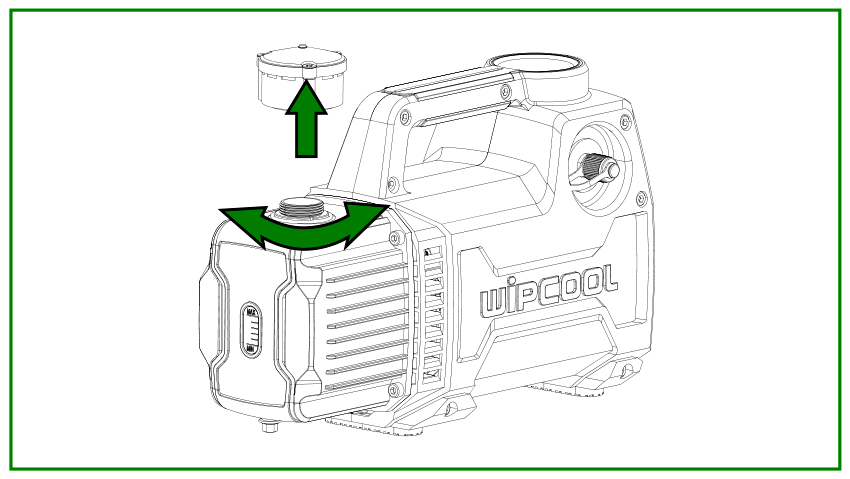
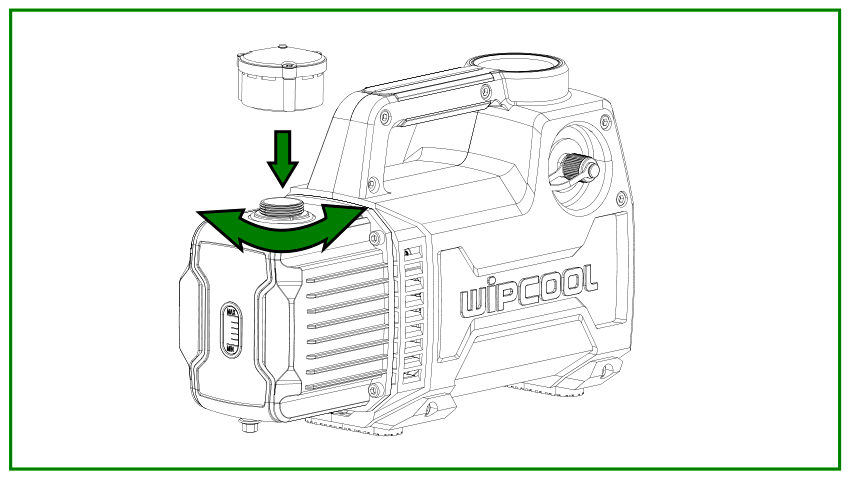
- 02Unscrew the oil filler cap and slowly pour in the oil.
- 03Slide the battery into the socket, start the pump and observe the oil level. When it stabilises halfway up the sight glass, tighten the oil filler cap.
- 04Turn off the pump using the switch.
Troubleshooting
| Problem | Possible cause | Solution |
|---|---|---|
| The pump does not reach the required vacuum | Insufficient oil | Top up the oil to halfway up the sight glass. |
| The pump does not reach the required vacuum | Emulsified or contaminated oil | Change the oil. |
| The pump does not reach the required vacuum | Blocked oil inlet or insufficient oil flow | Clean the oil inlet and filter screen. |
| The pump does not reach the required vacuum | Leak in the vacuum hose or reservoir | Check the vacuum hose and reservoir for leaks; repair the leak. |
| The pump does not reach the required vacuum | Pump unsuitable for the system | Check the system size and select a pump with an appropriate flow rate. |
| The pump does not reach the required vacuum | Parts worn after prolonged operation, increased clearance or an internal leak | You can replace the pump with a new one or have it repaired. Arrange repair through the service department - submit a request at wipcool.pl/serwis. |
| The pump does not reach the required vacuum | Contaminated sealing surface on the oil filler cap | Check and clean the sealing surface on the oil filler cap. |
| Oil leak | Worn shaft seal | Arrange repair through the service department - submit a request at wipcool.pl/serwis. |
| Oil leak | Loose or damaged oil reservoir connection | Arrange repair through the service department - submit a request at wipcool.pl/serwis. |
| Difficult start-up | Oil temperature too low | Before connecting to the system, switch on the pump with the inlet open and let it run until the oil warms up. |
| Difficult start-up | Motor or power supply problem | Check the battery and battery socket. Arrange repair through the service department - submit a request at wipcool.pl/serwis. |
| Difficult start-up | Contamination inside the pump | Arrange repair through the service department - submit a request at wipcool.pl/serwis. |
| The pump does not start or stops suddenly | Blown fuse | Check the fuse and replace it. |
| The pump does not start or stops suddenly | Motor or power supply problem | Check the battery and battery socket. Arrange repair through the service department - submit a request at wipcool.pl/serwis. |
Waste electrical and electronic equipment
- 01The crossed-out bin symbol means that the device must not be disposed of with other waste at the end of its life.
Under the applicable regulations on waste electrical and electronic equipment, products marked with the separate collection symbol must not be disposed of with other municipal waste. Because they contain harmful substances, electronic products that are not separately sorted may be hazardous to the environment and human health. Proper separate collection of waste electrical and electronic equipment prevents adverse effects on the environment.
By taking waste equipment to a collection point, the user contributes to its reuse, recycling and recovery.
Recycling - a method of protecting the environment. The process of recovering substances from waste that can be reused as raw materials.
Waste recovery - the use of waste that has lost its useful value, such as plastics, paper and cardboard, as secondary raw materials; the term is also commonly used to mean its destruction.
Information on the collection system for waste electrical and electronic equipment
- ■Waste electrical and electronic equipment must not be disposed of with other waste.
- ■The collection of incomplete electrical and electronic equipment and parts from waste equipment is prohibited.
- ■A distributor delivering equipment intended for households to a purchaser must collect waste equipment from households free of charge at the place of delivery, provided that the waste equipment is of the same type and performs the same function as the equipment delivered.
- ■The user may hand over waste equipment to a waste equipment collector, a treatment facility or a municipal waste collector in the municipality.
- ■Information on collection points is available on the public information bulletin (BIP) websites of regional, city and municipal offices.
Service and documents
Before submitting a request, prepare:
- ■Model - shown on the device nameplate and the invoice.
- ■Serial number - if there is none, provide the production number (e.g. 11/2025), usually found on the underside of the device.
- ■Proof of purchase - an invoice or receipt from an authorised distributor.
- ■Description of the fault - what is happening, since when and under what conditions.
You can submit a service request at wipcool.pl/serwis. You will also find the warranty terms there.