
 Distribution PL · 4REF
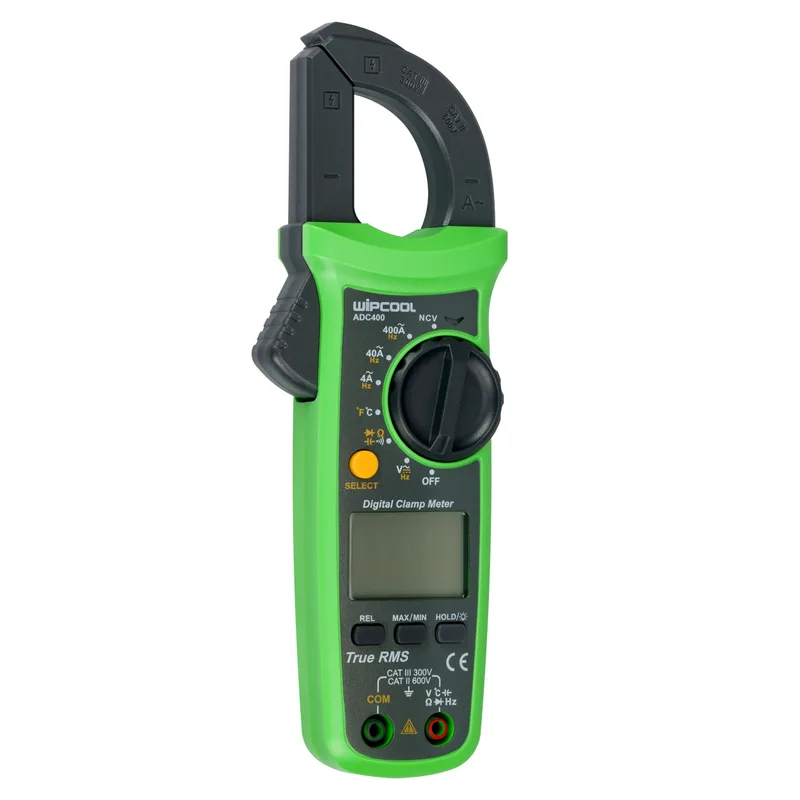
Wipcool ADC400 user manual
Read the entire manual before first use. Keep it for as long as you use the device.
Wipcool ADC400 user manual
The ADC400 is a digital clamp meter for measuring AC current, AC/DC voltage, frequency, resistance, capacitance and temperature, and for testing diodes and circuit continuity. It has a True RMS function and non-contact electric field detection (NCV).
The user manual is an integral part of the product. Please read this manual carefully and follow all instructions strictly.
General information
Wipcool products are designed for professional use by qualified air conditioning and refrigeration engineers. As the manufacturer, Wipcool specifies that our equipment should only be operated by suitably qualified and trained personnel.
- ■Observe all local safety regulations and general safety standards when using the Wipcool ADC400 Clamp Meter.
- ■The user manual should be kept near the device so that personnel can access it easily at any time.
- ■Before use, qualified personnel should read the user manual carefully and understand all the instructions it contains.
- ■The manufacturer accepts no liability for any damage resulting from improper use, failure to follow the user manual, unqualified personnel or any unauthorised modifications to the device.
- ■The general terms of sale contained in the sales documents apply.
Symbols and conventions
Signs and symbols used on the device and in the manual:
- 01
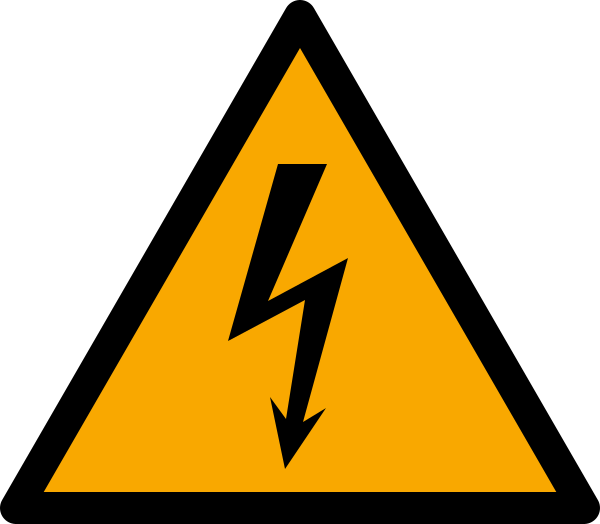 Hazardous voltage - risk of electric shock.
- 02
 Warning - read the text in the box next to the symbol.
- 03
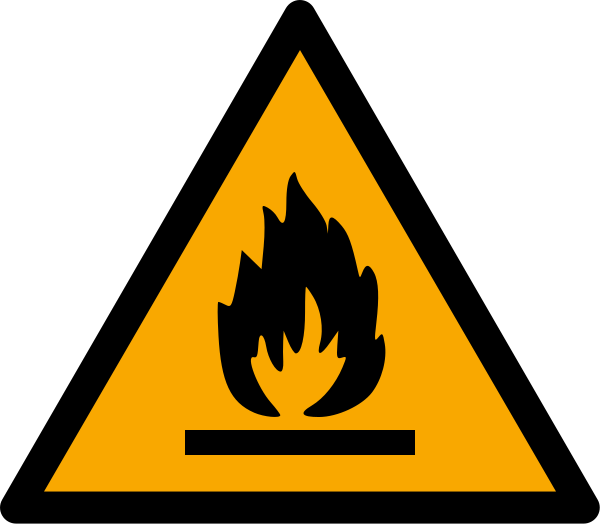 Warning of flammable materials; risk of fire or explosion.
- 04
 ACAlternating current or voltage.
- 05
 DCDirect current or voltage.
- 06
 Double or reinforced insulation.
- 07
 Earth.
- 08
 Indicates that the product meets the health, safety and environmental standards applicable in the European Union.
- 09
 Do not dispose of the meter with household waste.
Safety information
The meter is designed in accordance with EN 61010-1, EN 61010-2-032/033 and EN 61326-1. It is rated CAT II 600 V / CAT III 300 V, with double insulation and pollution degree II.
- ■Before each use, check the condition and operation of the meter and test leads.
- ■During measurement, keep your fingers behind the probe guards and the hand guard on the meter. Do not touch exposed wires, connectors, unused inputs or the circuit under test.
- ■Set the correct function before applying the probe tips. Do not change the function switch position during measurement.
- ■Do not exceed the voltage and current limits. If you do not know the value being measured, start with the highest range.
- ■Replace the batteries when the low battery symbol appears.
- ■Do not modify the meter's internal circuits.
- ■Do not use or store the meter at high temperatures, in high humidity or in a strong magnetic field.
Technical specifications
Accuracy in the tables is expressed as ±(a% of reading + b), where b is the number of resolution units for the specified range. For example, for the 4.000 V range with a resolution of 0.001 V, the +5 term represents an additional error of ±0.005 V. The calibration interval is 1 year. Reference conditions: 23 ±5 °C and relative humidity ≤80%.
To maintain accuracy, the operating temperature should be 18–28 °C, with fluctuations no greater than ±1 °C. Below 18 °C and above 28 °C, add a temperature error of 0.1 × the specified accuracy for each °C.
At an RF field strength of 1 V/m, add 5% of the measuring range to the specified error limit. At RF field strengths above 1 V/m, accuracy is not specified.
AC current
| Range | Resolution | Accuracy |
|---|---|---|
| 4.000 A | 0.001 A | ±(4% + 10) |
| 40.00 A | 0.01 A | ±(2% + 10) |
| 400.0 A | 0.1 A | ±(2% + 10) |
| Current frequency: 50–100 Hz | 0.1 Hz | ±(1% + 5) |
Overload protection: 420 A. Measure current at 0–40 °C.
- ■Current measurement bandwidth: 50–100 Hz. Guaranteed accuracy covers 1–100% of the range.
- ■On the 4 A range, with no current flowing, the meter may display a value below 0.003 A.
- ■When measuring current frequency, the input amplitude must be greater than 2 A.
- ■A conductor positioned away from the centre of the jaws introduces an additional error of ±1% of the reading.
AC voltage
| Range | Resolution | Accuracy |
|---|---|---|
| 4.000 V | 0.001 V | ±(1% + 5) |
| 40.00 V | 0.01 V | ±(0.8% + 5) |
| 400.0 V | 0.1 V | ±(0.8% + 5) |
| 600 V | 1 V | ±(0.8% + 5) |
| Voltage frequency: 10 Hz–10 kHz | 0.01 Hz–0.01 kHz | ±(1% + 5) |
Overload protection: 600 V RMS.
- ■Input impedance: approximately 10 MΩ. Bandwidth: 45–400 Hz. True RMS measurement.
- ■Guaranteed accuracy covers 1–100% of the range. When measuring voltage frequency, the input amplitude must be greater than 5 V.
- ■For non-sinusoidal AC voltage, the crest factor can be 3.0 at a reading of 4000 resolution units of the selected range. Add 3% to the error for a crest factor of 1–2, 5% for 2–2.5 and 7% for 2.5–3.
DC voltage
| Range | Resolution | Accuracy |
|---|---|---|
| 400.0 mV | 0.1 mV | ±(0.7% + 3) |
| 4.000 V | 0.001 V | ±(0.5% + 2) |
| 40.00 V | 0.01 V | ±(0.7% + 3) |
| 400.0 V | 0.1 V | ±(0.7% + 3) |
| 600 V | 1 V | ±(0.7% + 3) |
Overload protection: 600 V RMS.
- ■Input impedance: approximately 10 MΩ. Guaranteed accuracy covers 1–100% of the range.
- ■On the 400.0 mV range, with the probe tips shorted together, the meter may display up to 0.5 mV.
Resistance
| Range | Resolution | Accuracy |
|---|---|---|
| 400.0 Ω | 0.1 Ω | ±(1% + 2) |
| 4.000 kΩ | 0.001 kΩ | ±(0.8% + 2) |
| 40.00 kΩ | 0.01 kΩ | ±(0.8% + 2) |
| 400.0 kΩ | 0.1 kΩ | ±(0.8% + 2) |
| 4.000 MΩ | 0.001 MΩ | ±(2% + 5) |
| 40.00 MΩ | 0.01 MΩ | ±(2% + 5) |
Overload protection: 600 V RMS.
Circuit continuity and diode
| Function | Range / resolution | Parameters |
|---|---|---|
| Continuity | 400.0 Ω / 0.1 Ω | Open-circuit voltage: approximately 2.0 V. Signal thresholds are given in the instructions for use. |
| Diode | 4.000 V / 0.001 V | Open-circuit voltage: approximately 2.2 V; measurement of a PN junction with a forward voltage drop of ≤2 V. Typical voltage drop for a silicon PN junction: 0.5–0.8 V. |
Overload protection for both functions: 600 V RMS.
Capacitance
| Range | Resolution | Accuracy |
|---|---|---|
| 4.000 nF | 0.001 nF | ±(4% + 10) |
| 40.00 nF | 0.01 nF | ±(4% + 10) |
| 400.0 nF | 0.1 nF | ±(4% + 10) |
| 4.000 µF | 0.001 µF | ±(4% + 5) |
| 40.00 µF | 0.01 µF | ±(4% + 5) |
| 400.0 µF | 0.1 µF | ±(4% + 5) |
| 4.000 mF | 0.001 mF | ±10% |
Overload protection: 600 V RMS.
On the 4.000 nF range, with the probe tips unconnected, the meter may display up to 0.020 nF. Correction of this reading is described in the instructions for use.
Temperature
| Range | Resolution | Accuracy |
|---|---|---|
| -40 to +40 °C | 1 °C | ±4 °C |
| 40–500 °C | 1 °C | ±(1.5% + 5) |
| 500–1000 °C | 1 °C | ±(2% + 5) |
Overload protection: 600 V RMS.
Measurement with a type K temperature probe.
Non-contact electric field detection (NCV)
| Level | Detection threshold | Application |
|---|---|---|
| EFLo (lower detection threshold) | 24 ±6 V | Detection of a conductor's electric field and the presence of voltage in a socket. |
| EFHI (higher detection threshold) | 74 ±12 V | Detection of a conductor's electric field and the presence of voltage in a socket, and identification of a live or neutral conductor by signal strength. |
The result is affected by the socket design and the thickness of the conductor insulation.
Device diagram
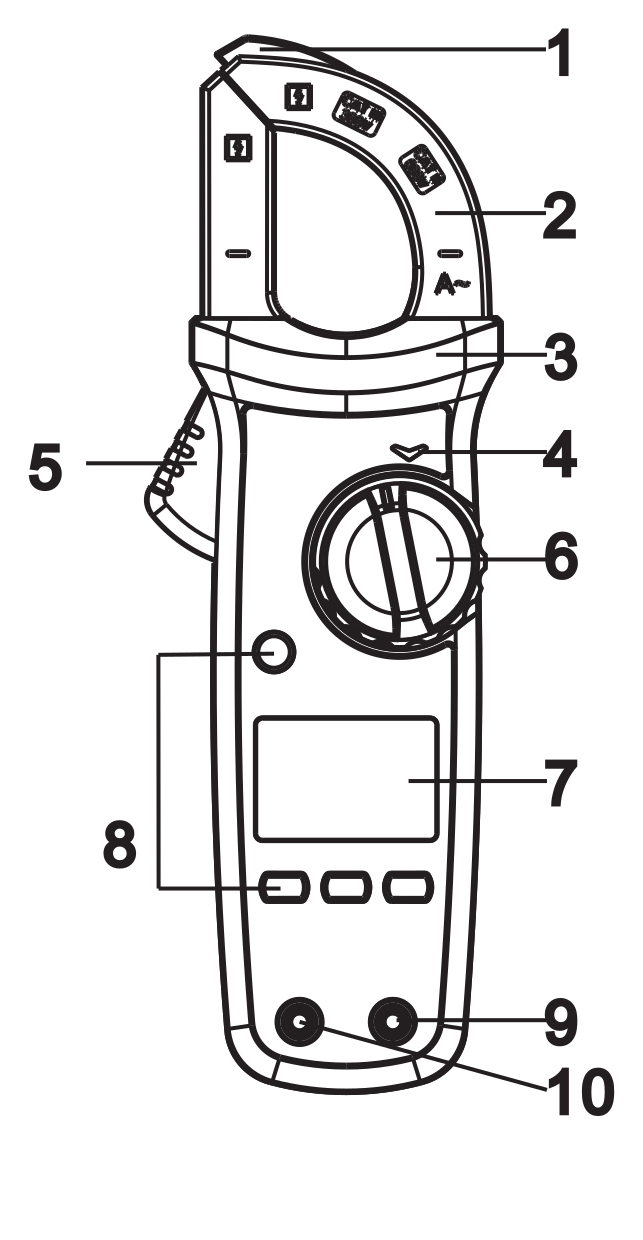
| No. | Name |
|---|---|
| 1 | NCV sensor tip |
| 2 | Measuring jaws |
| 3 | Hand guard |
| 4 | LED indicator |
| 5 | Jaw opening trigger |
| 6 | Function switch |
| 7 | LCD display |
| 8 | Function buttons |
| 9 | Positive input terminal V(+) - right |
| 10 | COM input terminal - left |
Buttons
| Button | Operation |
|---|---|
| SELECT | A short press selects a function available at the current function switch position: A or Hz on the current range, AC or DC for voltage, and EFHI or EFLo in NCV mode. Holding for approximately 2 s in the voltage position enables or disables Hz measurement. |
| REL | For voltage and capacitance measurement, stores the current reading as a reference and subtracts it from subsequent readings. Press again to exit relative measurement. |
| MAX/MIN | A short press enables maximum/minimum value measurement. Hold to exit this mode. The function works when measuring AC/DC voltage, AC current, resistance and temperature. |
| HOLD - hold reading Backlight | Briefly press HOLD to hold the reading on the display. Press briefly again to resume measurement. Hold for approximately 2 s to switch the backlight on or off. The backlight switches off automatically after 60 s. |
Package contents
After unpacking, check that the contents are complete and in good condition. Report any missing or damaged items to the seller.
| Item | Quantity |
|---|---|
| ADC400 clamp meter | 1 pc. |
| User manual | 1 pc. |
Storage
Store the meter in a dry place, away from direct sunlight and heat sources, at a temperature of -20 to +60 °C and a relative humidity of ≤80%.
Remove the batteries if the meter will not be used for an extended period.
Instructions for use
Before first use, insert the batteries as described under ‘Replacing the batteries’ (MAINTENANCE section).
For measurements using test leads, connect the red test lead to the right-hand V(+) terminal and the black lead to the left-hand COM terminal. The V(+) terminal is also used to measure resistance, continuity, diodes, capacitance and temperature. Measure current using the jaws.
Measuring AC current and current frequency
- 01Set the function switch to the 4 A, 40 A or 400 A current range. If you do not know the value, start at 400 A.
- 02To measure frequency, briefly press SELECT until Hz appears on the display.
- 03Press the jaw opening trigger and clamp the jaws around one conductor, positioning it centrally. Slowly release the jaw opening trigger and read the result. Releasing it abruptly may temporarily change the reading. Clamping around several conductors will produce an incorrect result.
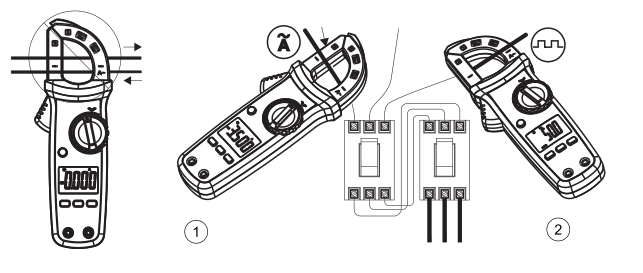
| No. | Description |
|---|---|
| 1 | AC current measurement |
| 2 | Current frequency measurement |
At a current of ≥400 A, the meter beeps and the warning symbol flashes. OL indicates that the range has been exceeded and there is a risk of damage to the meter.
AC/DC voltage and voltage frequency measurement
- 01Connect the red test lead to V(+) and the black test lead to COM, and set the function switch to the AC/DC/Hz voltage position.
- 02Press SELECT briefly to select AC or DC. To measure frequency, hold SELECT for approximately 2 s.
- 03Place the probe tips in parallel across the load or power source. For DC voltage, the red probe is positive and the black probe is negative. Read the result on the display.
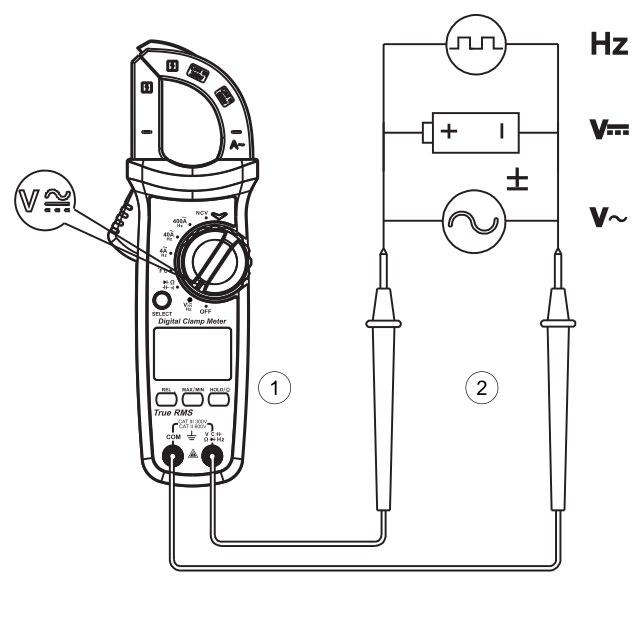
| No. | Description |
|---|---|
| 1 | Red test lead |
| 2 | Black test lead |
At a voltage of ≥30 V AC or ≥60 V DC, the high-voltage warning symbol appears.
Resistance, continuity, diode and capacitance measurements
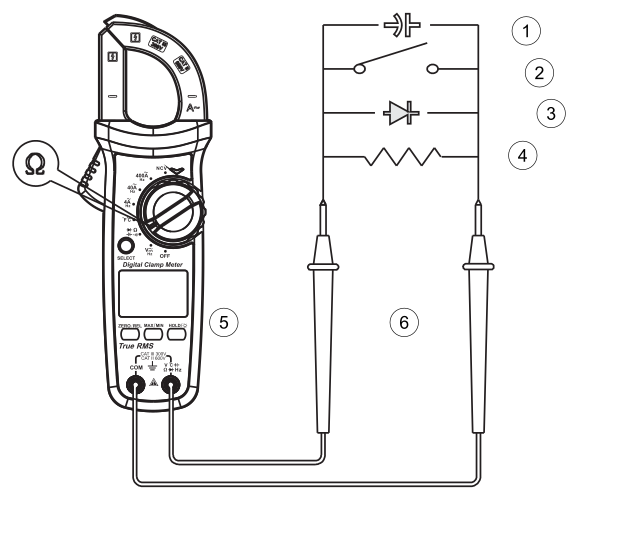
| No. | Description |
|---|---|
| 1 | Capacitance |
| 2 | Continuity |
| 3 | Diode |
| 4 | Resistance |
| 5 | Red test lead |
| 6 | Black test lead |
Resistance measurement
- 01Connect the test leads to V(+) and COM. Set the function switch to the Ω position (shared by resistance, continuity, diode and capacitance measurements); press SELECT to select Ω.
- 02Short the probe tips together. If the reading is at least 0.5 Ω, check the connection and condition of the test leads.
- 03Place the probe tips at both ends of the resistor and read the resistance.
OL indicates an open circuit or that the maximum range has been exceeded.
Circuit continuity test
- 01Connect the test leads to V(+) and COM. Set the function switch to the Ω position, then press SELECT to select the continuity symbol.
- 02Place the probe tips at both ends of the section of the circuit under test and read the result.
- ■Below 10 Ω, the buzzer sounds continuously.
- ■Above 31 Ω, the buzzer does not sound.
Diode test
- 01Connect the test leads to V(+) and COM. Set the function switch to the Ω position and press SELECT to select the diode symbol.
- 02Place the red probe tip on the diode anode (+) and the black probe tip on the cathode (-). Read the voltage drop.
- ■For a reading from 0.08 V to below 1.2 V, the buzzer sounds once, indicating that the diode is in good condition.
- ■For a reading of <0.08 V, the buzzer sounds continuously, indicating a faulty diode.
- ■OL appears if the diode is open or the polarity is reversed.
Capacitance measurement
- 01Connect the test leads to V(+) and COM. Set the function switch to the Ω position and press SELECT to select the capacitance symbol.
- 02For capacitance ≤100 nF, use REL with the probe tips disconnected to subtract their own capacitance. If measuring without REL, record the reading before connecting the capacitor.
- 03Connect the probe tips in parallel across the discharged capacitor. Wait for the reading to stabilise and read the result.
When measuring without REL, subtract the previously recorded reading from the result. For capacitance above 400 µF, stabilisation may take longer. For capacitance ≤1 mF, the response time is less than 3 s. OL indicates a short-circuited capacitor or that the range has been exceeded.
Temperature measurement
During temperature measurement, keep the ambient temperature around the meter within 18–28 °C.
- 01Connect the positive terminal of the type K temperature probe to V(+) and the negative terminal to COM. Set the function switch to the temperature position. The ambient temperature will appear on the display.
- 02Press SELECT to select °C before placing the type K temperature probe on the object.
- 03Place the type K temperature probe on the object and read the temperature after a few seconds.
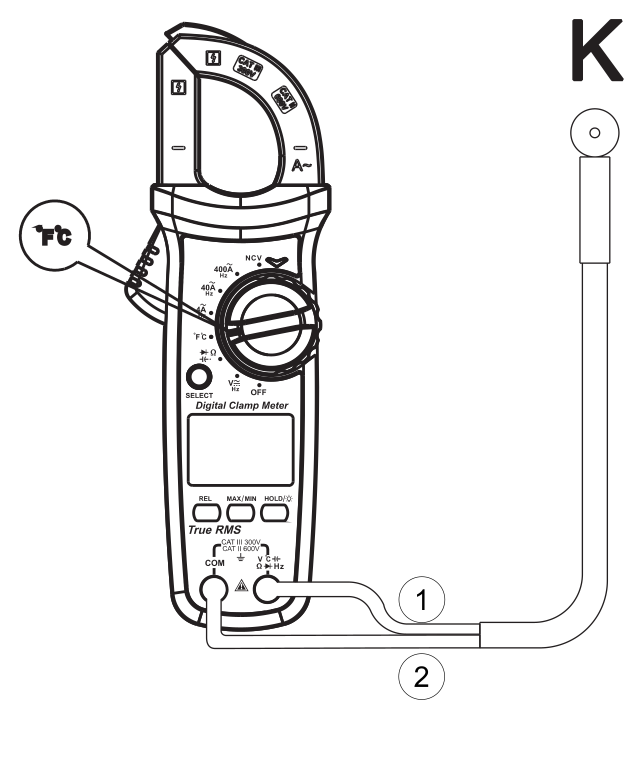
| No. | Description |
|---|---|
| 1 | Red type K temperature probe lead (+) |
| 2 | Black type K temperature probe lead (-) |
Non-contact electric field detection (NCV)
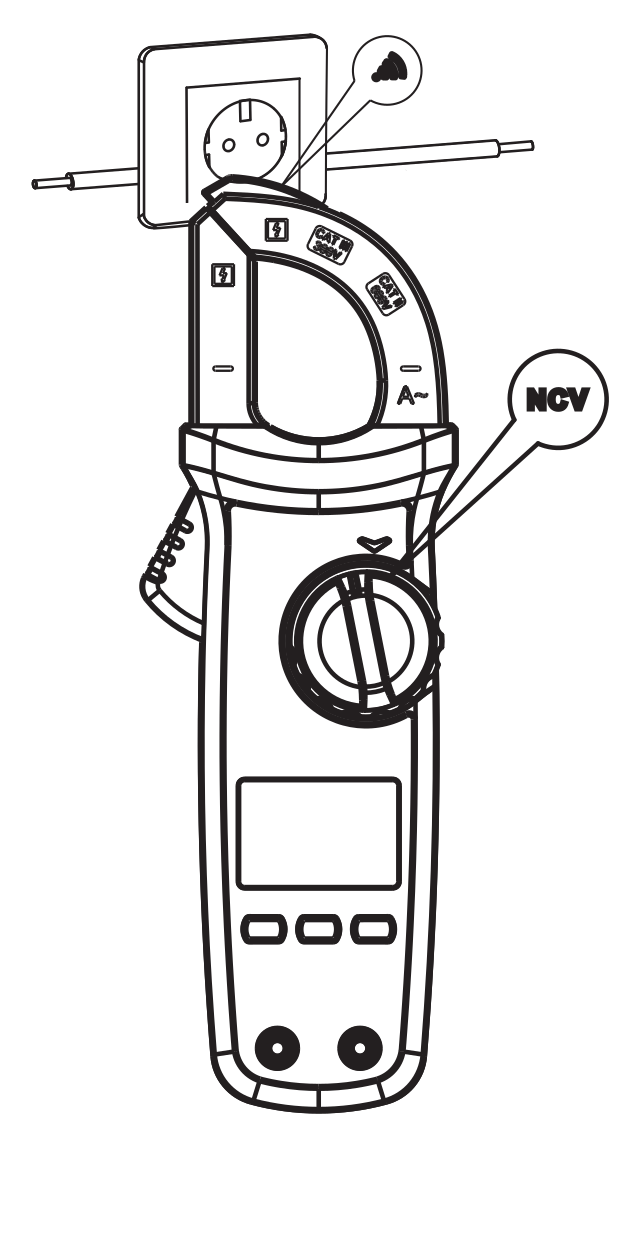
- 01Set the function switch to the NCV position. EFHI mode is enabled by default; press SELECT briefly to switch between EFHI and EFLo modes. For a 230 V supply, select EFHI mode.
- 02Bring the NCV sensor tip on the jaws close to the socket or insulated conductor under test.
- 03Observe the segments on the display, the red LED indicator and the buzzer signals. As the field strength increases, more segments appear, and the sound and flashing become more frequent.
Automatic power-off
After 15 min of inactivity (without using the function switch or buttons), the meter switches off automatically. Wake it by pressing any button, or set the switch to OFF and switch it on again. To disable automatic power-off, hold SELECT and switch on the meter using the function switch. Restarting without holding SELECT restores this function.
Meter signals
A valid button press or turn of the function switch is confirmed by a beep lasting approximately 0.25 s. An intermittent sound indicates that the current or voltage range has been exceeded.
When the battery voltage falls below 2.5 V, the low battery symbol appears. Below 2.4 V, Lo.bt also appears for approximately 10 s; after three beeps, the meter switches off.
Finishing a measurement
After measuring with the test leads, move the probe tips away from the object under test; after measuring temperature, move the type K temperature probe away. After a clamp measurement, open the jaws and remove the meter from the conductor; after measuring in NCV mode, move the NCV sensor tip away. Set the function switch to OFF to conserve battery power.
Maintenance
General recommendations
Clean the casing with a soft, damp cloth and a mild detergent. Do not use abrasives or solvents.
If the meter malfunctions, stop using it. Have it repaired by the service team - submit a service request at wipcool.pl/serwis.
Replacing the batteries
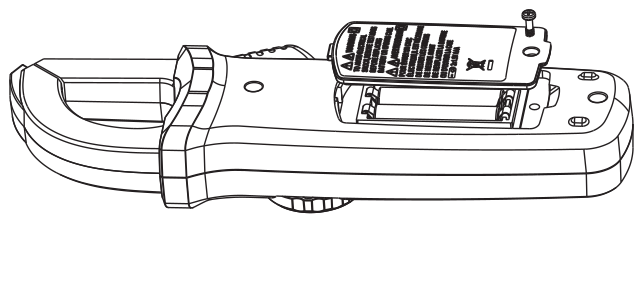
- 01Set the function switch to OFF and remove the test leads from the meter sockets.
- 02Undo the battery compartment screw and remove the cover.
- 03Remove the depleted batteries. Insert new batteries according to the polarity markings.
- 04Fit the battery compartment cover and tighten the screw.
Waste electrical and electronic equipment
- 01The crossed-out bin symbol means that the end-of-life device must not be disposed of with other waste.
In accordance with applicable regulations on waste electrical and electronic equipment, products marked with the separate collection symbol must not be disposed of with other municipal waste. Because they contain harmful substances, electronic products that are not collected separately may be hazardous to the environment and human health. Proper separate collection of waste electrical and electronic equipment prevents negative effects on the environment.
By taking waste equipment to a collection point, the user contributes to its reuse, recycling and recovery.
Recycling - one method of protecting the environment. The process of recovering substances from waste that can be reused as raw materials.
Waste recovery - the use (also commonly understood as the destruction) of waste that has lost its useful value, such as plastics, paper and cardboard, as secondary raw materials.
Information on the waste electrical and electronic equipment collection system
- ■Waste electrical and electronic equipment must not be disposed of with other waste.
- ■The collection of incomplete electrical and electronic equipment and parts from waste equipment is prohibited.
- ■A distributor delivering equipment intended for households to a purchaser is required to take back household waste equipment free of charge at the place of delivery, provided that the waste equipment is of the same type and performs the same function as the equipment delivered.
- ■The user may hand over waste equipment to a waste equipment collector, a treatment facility or a municipal waste collector in the municipality.
- ■Information on collection points is available on the BIP public information websites of regional, city and municipal authorities.
Service and documents
Before submitting a service request, prepare:
- ■Model - shown on the device nameplate and on the invoice.
- ■Serial number - if there is none, provide the production number (e.g. 11/2025), usually found on the underside of the device.
- ■Proof of purchase - an invoice or receipt from an authorised distributor.
- ■Description of the fault - what is happening, when it started and under what conditions.
You can submit a service request at wipcool.pl/serwis. The warranty terms are also available there.
Warranty period: 1 year.