
 Distribution PL · 4REF
Wipcool MRM75 user manual
Read the entire manual before first use. Keep it for as long as you use the device.
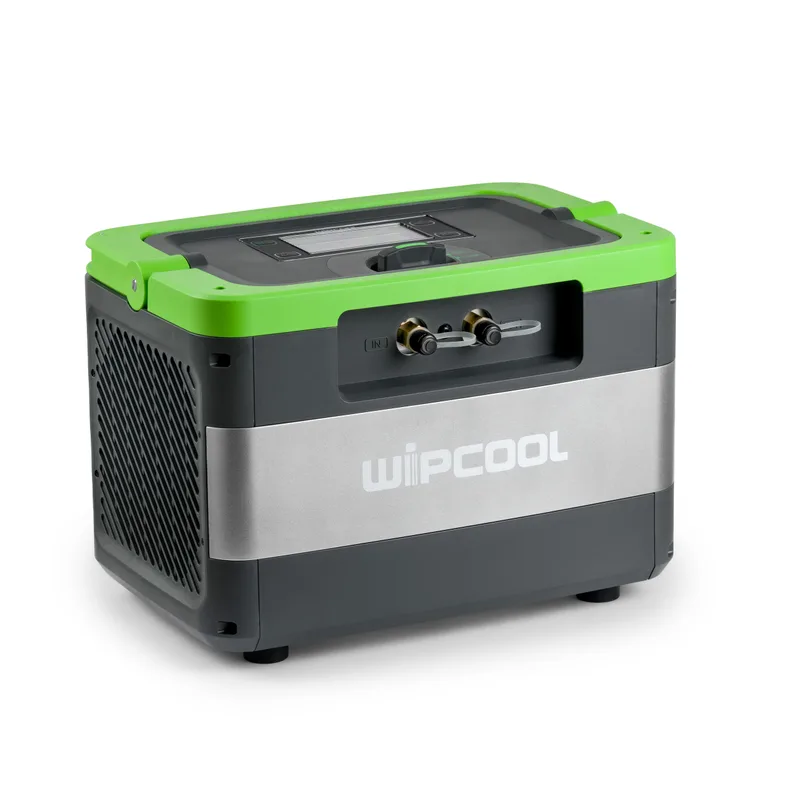
Wipcool MRM75 / MRM75OS user manual
The Wipcool MRM75 / MRM75OS refrigerant recovery machine is designed to recover liquid and vapour refrigerant. It has a two-piston compressor.
The user manual is an integral part of the product. Read this manual carefully and follow all instructions strictly.
General information
Wipcool products are designed for professional use by qualified air conditioning and refrigeration engineers. As the manufacturer, Wipcool stipulates that our equipment should only be operated by appropriately qualified and trained personnel.
- ■Follow all local safety regulations and general safety standards when using the Wipcool MRM75 / MRM75OS refrigerant recovery machine.
- ■The user manual should be kept near the machine so that personnel can access it easily at all times.
- ■Before use, qualified personnel should read the user manual carefully and understand all the instructions it contains.
- ■The manufacturer accepts no liability for any damage resulting from improper use, failure to follow the user manual, lack of personnel qualifications or any unauthorised modifications to the machine.
- ■The general terms and conditions of sale contained in the sales documents apply.
Symbols and conventions
Symbols and markings used on the machine and in the manual:
- 01
 Warning - read the text in the box next to the symbol.
- 02
 Low temperature - risk of frostbite from contact with refrigerant.
- 03
 Hazardous voltage - risk of electric shock.
- 04
 Pressurised gas cylinder - risk of rupture if overfilled.
- 05
 Notice - risk of damage to the machine or an incorrect result.
- 06
 Wear eye protection.
- 07
 Wear protective gloves when working with refrigerant.
- 08
 Before starting work, read all safety and installation instructions carefully.
- 09
 Indicates that the product meets the health, safety and environmental standards applicable in the European Union.
- 10RoHSThe product meets the requirements for the restriction of hazardous substances.
- 11
 Do not dispose of the machine with household waste.
Safety information
Working with refrigerant
- ■Work in a well-ventilated room.
- ■Do not mix different refrigerants in one cylinder - they cannot be separated or reused.
- ■Do not expose the machine to sunlight or rain. Place it level to reduce compressor vibration and wear on components.
Power supply
- ■Replace a damaged power cable with a cable with a protective earth conductor designed for this machine.
Protecting the machine
- ■Always use a filter drier recommended for the machine during recovery. Use a separate filter for each type of refrigerant and replace it frequently.
- ■When recovering refrigerant from a system after a compressor burnout, use two filter driers.
- ■After recovery, remove the refrigerant remaining in the machine according to the PURGE procedure. Refrigerant left in the machine can expand and damage its components.
- ■When the machine is not in use, close all valves, turn the control knob to CLOSE and fit caps to the inlet and outlet ports. This protects the interior from air and moisture.
Technical specifications
Refrigerants
| Group | Refrigerants |
|---|---|
| III | R12, R134a, R401C, R406A, R500, R1234yf |
| IV | R22, R401A, R401B, R402B, R407C, R407D, R408A, R409A, R411A, R411B, R412A, R502, R509 |
| V | R402A, R404A, R407A, R407B, R410A, R507, R32 |
Recovery rate
| State / method | Group III | Group IV | Group V |
|---|---|---|---|
| Vapour | 0.5 kg/min | 0.7 kg/min | 0.7 kg/min |
| Liquid | 2.6 kg/min | 3.0 kg/min | 3.9 kg/min |
| Push/Pull | 8.2 kg/min | 9.3 kg/min | 10.5 kg/min |
Machine diagram
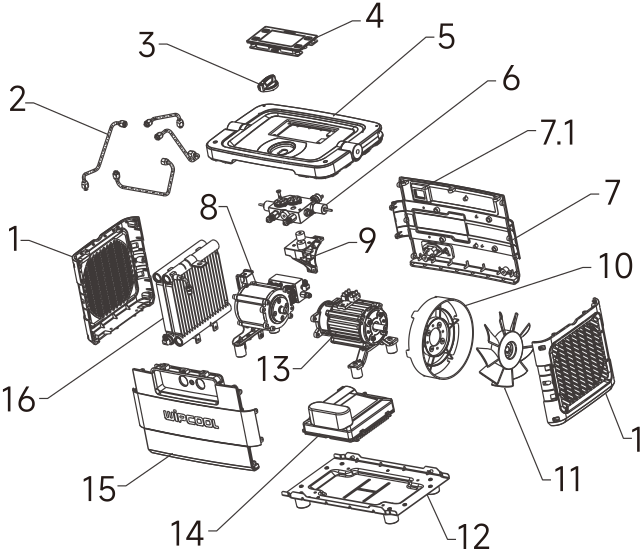
| No. | Name |
|---|---|
| 1 | Side cover |
| 2 | Copper tube |
| 3 | Switch next to the digital panel |
| 4 | Digital panel |
| 5 | Top cover |
| 6 | Control valve |
| 7 | Rear cover |
| 7.1 | Switch next to the rear cover |
| 8 | Compressor |
| 9 | Control valve knob |
| 10 | Air duct cover |
| 11 | Fan |
| 12 | Bottom support plate |
| 13 | Motor |
| 14 | Control PCB |
| 15 | Front cover |
| 16 | Condenser |
Digital panel
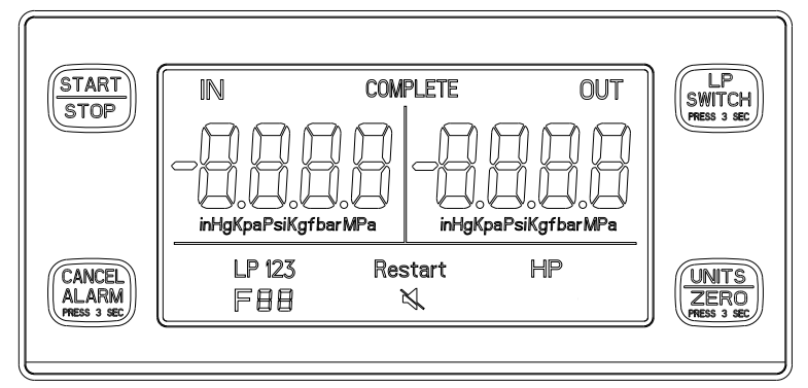
The IN reading corresponds to the low-side gauge and shows the pressure at the compressor inlet. The OUT reading corresponds to the high-side gauge and shows the outlet pressure.
| Button | Function |
|---|---|
| START/STOP | Starts or stops the machine. |
| LP SWITCH | Hold for 3 s to switch between LP1 and LP2 modes. |
| UNITS/ZERO | A short press changes the unit: inHg, kPa, Psi, Kgf, bar, MPa. Holding for 3 s zeroes the readings. |
| CANCEL ALARM | A short press clears the alarm. Holding for 3 s activates MUTE mode and illuminates its indicator. |
Control valve knob
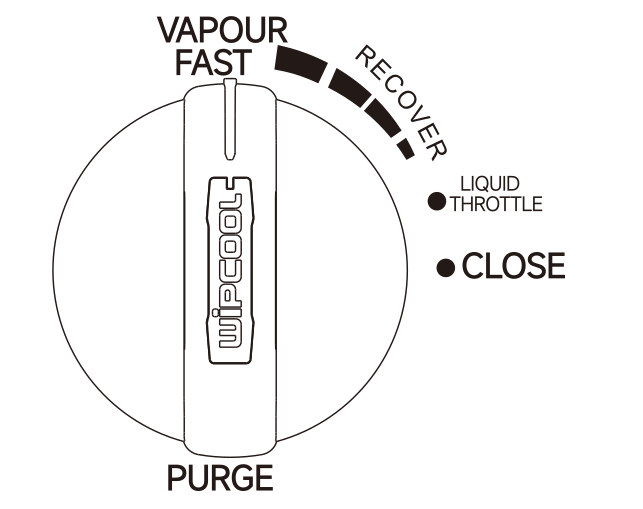
| Marking | Meaning |
|---|---|
| LIQUID THROTTLE | Throttles the flow during liquid recovery. |
| VAPOUR / FAST | Vapour recovery / fast recovery. |
| RECOVER | Recovery adjustment range marked by an arc. |
| CLOSE | Closed. |
| PURGE | Purges the remaining refrigerant from the machine. |
Modes and indicators
| Indicator | Operation |
|---|---|
| LP1 | In LP1 mode, when the inlet pressure falls below approximately -0.47 bar relative to atmospheric pressure for more than 20 s, the machine stops when low-pressure protection activates. COMPLETE appears; the audible alarm sounds if MUTE mode is off. When the inlet pressure rises to at least 0 bar, the alarm stops, COMPLETE disappears, and LP1 and RESTART flash. Press START/STOP to resume operation; LP1 will remain steadily lit. |
| LP2 | In LP2 mode, the machine runs continuously regardless of inlet pressure. |
| HP | An outlet pressure above 38.5 bar stops the machine and triggers the alarm. Before restarting, eliminate the cause of the pressure rise. When the outlet pressure falls below 29 bar, the alarm stops and HP and RESTART flash. Press START/STOP to resume operation. |
| RESTART | Once the fault has been cleared, its message and RESTART flash. Press START/STOP to resume operation; RESTART goes out after the machine starts. |
| COMPLETE | Recovery complete following activation of low-pressure protection in LP1 mode. |
| MUTE | Mutes the audible alarm. |
| F1-F8 | Fault codes described in the ‘TROUBLESHOOTING’ section. |
Package contents
| Item |
|---|
| MRM75 or MRM75OS machine |
| 1.8 m power cable |
| Filter drier |
| Shoulder strap |
| Service hose |
| User manual |
After unpacking, check that all items are present and in good condition. Report any missing or damaged items to the seller.
Transport and storage
- ■Transport the machine in its original packaging.
- ■Store it in a dry place, away from direct sunlight and heat sources, at a temperature of -20 to +60 °C.
- ■Before prolonged storage, completely remove the remaining refrigerant and flush the machine with dry nitrogen.
Connection
Preparing the cylinder and hoses
Connection also requires a recovery cylinder, an electronic scale, a manifold gauge set and additional service hoses shown in Figure 4.
Before first use, remove the nitrogen from the cylinder. Before recovery, evacuate the cylinder to approximately -1 bar relative to atmospheric pressure to remove non-condensable gases.
For recovery, a hose with an internal diameter greater than 4 mm and a length not exceeding 1.5 m is recommended.
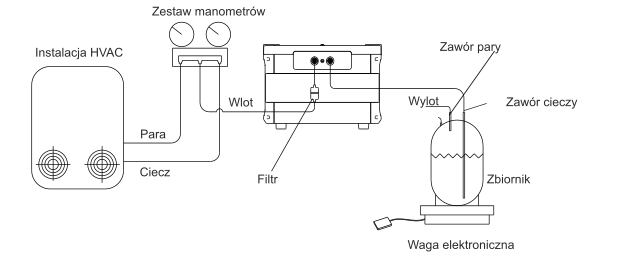
- 01With the power supply disconnected, turn the knob to LIQUID THROTTLE.
- 02Connect the refrigeration system, manifold gauge set, filter drier, machine and cylinder on the scale using hoses as shown in Figure 4. Check that the connections are secure and leak-tight.
Operation
Liquid and vapour recovery
- 01Connect the machine to a socket with a protective earth (PE) and press START/STOP to start it.
- 02Open the cylinder valve, then the liquid valve on the manifold gauge set, and start recovery.
- 03After liquid recovery is complete, turn the knob to FAST to speed up recovery of the remaining refrigerant vapour.
- 04Continue recovery until the required vacuum level is reached. In LP1 mode, the machine stops automatically when low-pressure protection activates; in LP2 mode, the operator stops the machine.
- 05After recovery, purge the machine as described below.
If code F2 appears at start-up, follow the F2 instructions in the ‘TROUBLESHOOTING’ section. If the compressor knocks or the problem persists, stop work. Have the machine repaired by the service centre - submit a service request at wipcool.pl/serwis.
Purging the machine - PURGE
- 01After recovery is complete, leave the power supply connected and turn the knob to PURGE.
- 02Continue purging until the required vacuum level is reached.
- 03Close the cylinder valve, then close the outlet hose shut-off valve, if fitted.
- 04Close the manifold gauge set valves, then close the valve between the refrigeration system and the manifold gauge set.
- 05If the machine is still running, stop it using START/STOP. Disconnect the power supply, then carefully and slowly disconnect the hoses.
- 06Turn the knob to CLOSE and fit caps to the inlet and outlet ports.
Push/Pull method
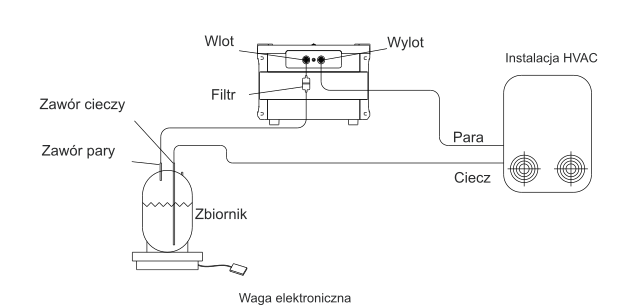
The Push/Pull method is intended for large systems containing more than 10 kg of liquid refrigerant. Figure 5 shows the connections. When the scale reading stops changing or changes very slowly, recovery by this method is complete. Recover the remaining refrigerant vapour using the liquid and vapour recovery method, then purge the machine with the knob in the PURGE position.
Oil separator - MRM75OS
A drain tube and a flexible clamp are required to connect the separator.
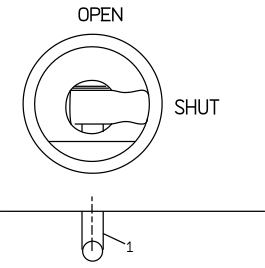
- ■When using for the first time, connect the drain tube to the oil separator outlet and secure it with the flexible clamp.
- ■Drain the oil only when the machine is stopped and contains no refrigerant.
Maintenance
Cleaning and inspection
Clean the strainer in the inlet port regularly and check that it is correctly seated. Replace a damaged strainer.
Service access
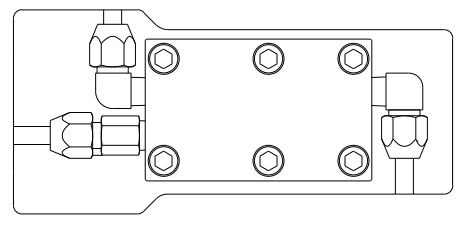
Repairing or replacing the compressor piston rings requires removal of the long plastic cover at the rear of the machine and removal of the cylinder head. Have the machine repaired by the service centre - submit a service request at wipcool.pl/serwis.
Troubleshooting
Fault codes
| Code | Meaning | Remedy |
|---|---|---|
| F1 | Pressure sensor disconnected; poor connection or short circuit in the low-pressure or high-pressure sensor | Have the machine repaired by the service centre - submit a service request at wipcool.pl/serwis. |
| F2 | Overcurrent protection | Follow the instructions for the relevant F2 cause in the table below. |
| F3 | Undervoltage protection | Check the supply voltage. If it is correct, stop work. Have the machine repaired by the service centre - submit a service request at wipcool.pl/serwis. |
| F4 | Overvoltage protection | Check the supply voltage. If it is correct, stop work. Have the machine repaired by the service centre - submit a service request at wipcool.pl/serwis. |
| F5 | Temperature sensor protection | Have the machine repaired by the service centre - submit a service request at wipcool.pl/serwis. |
| F6 | Thermal protection circuit open | Once the protection has reset and F6 starts flashing, resume operation. If the problem persists, stop work. Have the machine repaired by the service centre - submit a service request at wipcool.pl/serwis. |
| F7 | Motor phase failure | Have the machine repaired by the service centre - submit a service request at wipcool.pl/serwis. |
| F8 | Main signal failure | Have the machine repaired by the service centre - submit a service request at wipcool.pl/serwis. |
Symptoms and causes
| Problem | Possible cause | Remedy |
|---|---|---|
| Display does not light up when switched on | Damaged power cable | Replace the damaged power cable with a cable with a protective earth conductor designed for this machine. |
| Display does not light up when switched on | Loose internal wiring | Have the machine repaired by the service centre - submit a service request at wipcool.pl/serwis. |
| Display does not light up when switched on | Communication error | Have the machine repaired by the service centre - submit a service request at wipcool.pl/serwis. |
| Display does not light up when switched on | Damaged control PCB | Have the machine repaired by the service centre - submit a service request at wipcool.pl/serwis. |
| No response when switched on | High-pressure switch disconnected | Have the machine repaired by the service centre - submit a service request at wipcool.pl/serwis. |
| No response when switched on | F3, F4, F5, F6, F7 or F8 | Follow the fault code table. |
| No response when switched on | F2 only during start-up | For liquid recovery, turn the knob to CLOSE; for vapour recovery, turn it to PURGE. Press START/STOP and turn the knob to FAST. |
| No response when switched on | F2 with high inlet or outlet pressure, or liquid slugging | Stop work. Have the machine repaired by the service centre - submit a service request at wipcool.pl/serwis. |
| No response when switched on | F2 with no load | Have the machine repaired by the service centre - submit a service request at wipcool.pl/serwis. |
| No response when switched on | Damaged motor or other electronic components | Have the machine repaired by the service centre - submit a service request at wipcool.pl/serwis. |
| Machine stops during operation | HP - outlet valve or cylinder valve closed | Check the valves and open the closed valve. Resume operation once the HP/RESTART conditions are met. |
| Machine stops during operation | HP - overheated cylinder | Wait for the cylinder to cool on its own and the pressure to fall. Resume operation once the HP/RESTART conditions are met. |
| Machine stops during operation | F6 - thermal protection activated | Follow the instructions for code F6. |
| Machine stops during operation | COMPLETE - low-pressure protection activated | Carry out the PURGE procedure. |
| Machine stops during operation | Damaged motor or other electronic components | Have the machine repaired by the service centre - submit a service request at wipcool.pl/serwis. |
| Recovery too slow | Cylinder pressure too high | Cool the cylinder to reduce the pressure. |
| Recovery too slow | Valve not open far enough | Turn the knob towards FAST. |
| Recovery too slow | Worn compressor seals | Arrange for the service centre to repair it - submit a service request at wipcool.pl/serwis. |
| Unable to achieve a vacuum | Loose hose connections | Tighten the connections. |
| Unable to achieve a vacuum | Leak in system components | Arrange for the service centre to repair it - submit a service request at wipcool.pl/serwis. |
Waste electrical and electronic equipment
- 01The crossed-out wheeled bin symbol means that used equipment must not be disposed of with other waste.
Under applicable regulations on waste electrical and electronic equipment, products marked with the separate collection symbol must not be disposed of with other municipal waste. Due to their hazardous substance content, electronic products that are not collected separately may be dangerous to the environment and human health. Proper separate collection of waste electrical and electronic equipment prevents adverse effects on the environment.
By taking waste equipment to a collection point, the user contributes to its reuse, recycling and recovery.
Recycling - one method of protecting the environment. The process of recovering substances from waste that can be reused as raw materials.
Waste recovery - the use (also commonly referred to as destruction) of waste that has lost its useful value, such as plastics, paper and cardboard, as secondary raw materials.
Information on the collection system for waste electrical and electronic equipment
- ■Waste electrical and electronic equipment must not be disposed of with other waste.
- ■The collection of incomplete electrical and electronic equipment and parts from waste equipment is prohibited.
- ■A distributor delivering equipment intended for households to a purchaser must collect waste equipment from households free of charge at the place of delivery, provided that the waste equipment is of the same type and performs the same function as the equipment delivered.
- ■The user may hand over waste equipment to a waste equipment collector, a treatment facility or a municipal waste collector operating in the municipality.
- ■Information on collection points is available on the Public Information Bulletin (BIP) websites of regional, city and municipal offices.
Service and documents
Before submitting a service request, prepare:
- ■Model - shown on the device nameplate and on the invoice.
- ■Serial number - if there is none, provide the production number (e.g. 11/2025), usually found on the underside of the device.
- ■Proof of purchase - an invoice or receipt from an authorised distributor.
- ■Description of the fault - what is happening, when it started and under what conditions.
You can submit a service request at wipcool.pl/serwis. You will also find the warranty terms there.