
 Distribution PL · 4REF
Wipcool HTW-80 user manual
Read the entire manual before first use. Keep it for as long as you use the device.
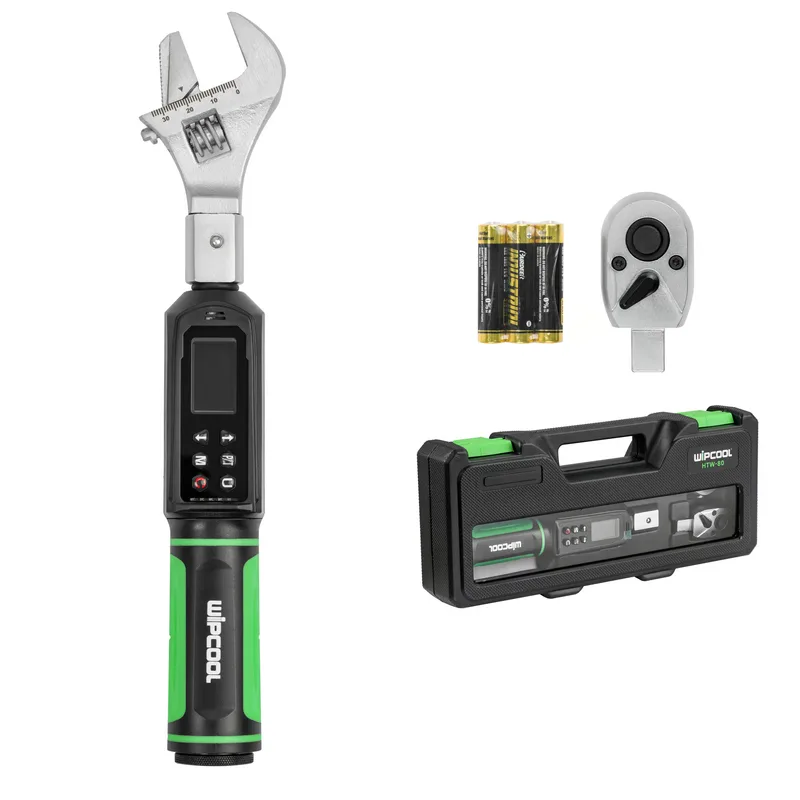
Wipcool HTW-80 user manual
The Wipcool HTW-80 Torque Wrench is used to tighten connections to a specified torque. It displays the current torque or peak value and allows you to save measurement results.
The user manual is an integral part of the product. Please read this manual carefully and follow all instructions closely.
General information
Wipcool products are designed for professional use by qualified air conditioning and refrigeration engineers. As the manufacturer, Wipcool stipulates that our equipment should only be operated by suitably qualified and trained people.
- ■All local safety regulations and general safety standards must be observed when using the Wipcool HTW-80 Torque Wrench.
- ■The user manual should be kept near the device so that personnel can access it easily at all times.
- ■Before use, qualified personnel should read the user manual carefully and understand all the instructions it contains.
- ■The manufacturer accepts no liability for any damage resulting from improper use, failure to follow the user manual, lack of personnel qualifications or any unauthorised modifications to the device.
- ■The general terms of sale set out in the sales documents apply.
Symbols and conventions
Symbols and markings used on the device and in the manual:
- 01
 Warning - read the text in the box next to the symbol.
- 02
 Notice - risk of damage to the device or an incorrect result.
- 03
 Dangerous voltage - risk of electric shock.
- 04
 Before starting work, read all safety and installation instructions carefully.
- 05
 Wear eye protection.
- 06
 Do not dispose of the wrench with household waste.
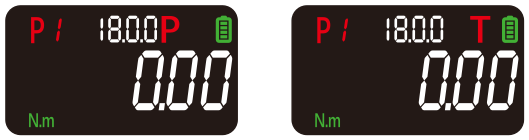
T (Track) is tracking mode, and P (Peak) is peak mode. N·m is the newton metre, a unit of torque. The markings lb·ft, lb·in, kg·cm and kg·m indicate the other units on the display.
Safety information
- ■Do not tighten connections when the wrench is switched off and do not press the buttons while applying force.
- ■Do not disassemble the wrench except to replace the batteries. A wrench that you have disassembled yourself cannot be repaired.
Technical specifications
Device diagram
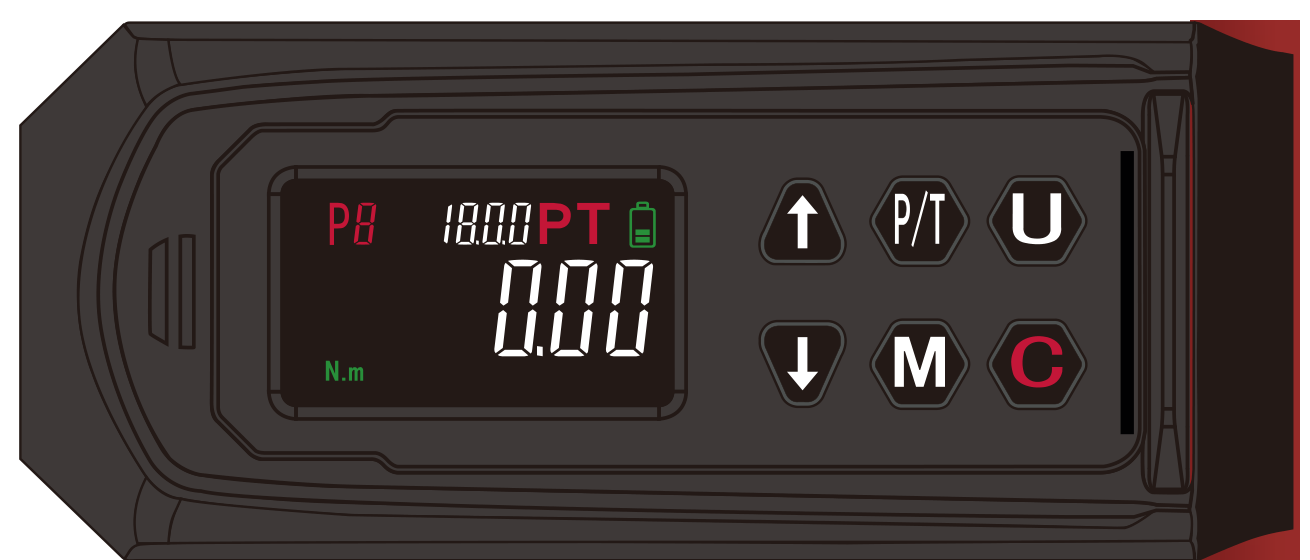
The display is on the left side of the panel and the buttons are on the right. The buzzer is to the left of the display, and the LED is on the right side of the panel.
| Button | Function |
|---|---|
| C | A short press switches the wrench on. Holding for 3 s switches the wrench off. Confirms the setting and closes the memory review. |
| U | Switches torque units. |
| P/T | Switches between T tracking mode and P peak mode. |
| ↑ / ↓ | Select a setting and browse saved results. |
| M | Saves the result in P peak mode. Hold to open the memory review. |
| Indication | Meaning |
|---|---|
| Large digits | Torque reading. |
| Set value | Set torque value. |
| P / T | Selected measurement mode. |
| Unit | Torque unit. |
| Battery icon | Battery level. |
| Record number | Measurement number when browsing memory. |
How to use
Starting and tightening
- 01Briefly press C. A single beep confirms that the wrench is on.
- 02Check the battery icon on the display. If it indicates a low battery level, switch off the wrench and replace the batteries (see the ‘MAINTENANCE’ section, ‘Batteries’).
- 03Press U until N·m appears. The units cycle in this order: N·m, lb·ft, lb·in, kg·cm, kg·m.
- 04Press P/T to select T tracking mode or P peak mode. Check the mode indication on the display.
- 05If the value required for the connection being tightened is among the 10 presets, select it using ↑ / ↓ and confirm with C.
- 06Adjust the jaw opening to fit the nut and place the wrench on it.
- 07Tighten the connection while watching the torque on the display. Stop tightening when the reading reaches the required torque.
Indication
The wrench indicates torque with a sound, an LED and vibration.
T tracking mode
In T tracking mode, the display shows the torque in real time according to the force applied. When the load is removed from the wrench, the reading returns to zero.
P peak mode
In P peak mode, the result remains on the screen for 10 s after the load is removed from the wrench. Press M during this time to save it. If it is not saved, the reading returns to zero.
Browsing saved results
A result is saved in the unit selected at the time of saving.
- 01With the wrench switched on, hold M to open the memory review.
- 02Press ↑ / ↓ to browse the results. Hold a button for 3 s to browse quickly.
- 03Press C to exit the memory review.
Switching off
After finishing work, hold C for 3 s. The wrench switches off automatically after 120 s of inactivity.
Maintenance
Batteries
Insert AAA alkaline batteries according to the polarity markings. Use batteries of the same type.
Do not charge alkaline batteries. If you will not use the wrench for an extended period, remove the batteries.
Calibration and repair
Have the wrench calibrated once a year or after 5000 tightening operations, whichever comes first.
After an overload, have the wrench repaired and recalibrated by the service centre - submit a request at wipcool.pl/serwis.
Troubleshooting
| Problem | Possible cause | Solution |
|---|---|---|
| The wrench does not switch on | Batteries are not inserted | Insert the batteries according to the polarity markings. |
| The wrench switches off after a short time | Batteries are depleted or damaged | Replace the batteries with new ones. |
| The wrench switches off after a short time | Damaged electronics | Have the service centre repair the wrench - submit a request at wipcool.pl/serwis. |
| The wrench does not reach the set torque | Batteries are depleted | Replace the batteries with new ones. |
| The wrench does not reach the set torque | Overheating | Put the wrench down and wait for it to cool. |
| Abnormal vibrations | Batteries are inserted incorrectly | Switch off the wrench immediately. Insert the batteries according to the polarity markings. |
| The wrench does not respond to the buttons or does not switch off | Batteries are losing power | Replace the batteries with new ones. |
| The wrench does not respond to the buttons or does not switch off | Drive, mechanism or electronics failure | Remove the batteries. Have the service centre repair the wrench - submit a request at wipcool.pl/serwis. |
Waste electrical and electronic equipment
- 01The crossed-out bin symbol means that the device must not be disposed of with other waste at the end of its life.
Under applicable regulations on waste electrical and electronic equipment, products marked with the separate collection symbol must not be disposed of with other municipal waste. Because they contain harmful substances, electronic products that are not collected separately may be hazardous to the environment and human health. Proper separate collection of waste electrical and electronic equipment prevents adverse effects on the environment.
By taking waste equipment to a collection point, you contribute to its reuse, recycling and recovery.
Recycling - one method of protecting the environment. The process of recovering substances from waste that can be reused as raw materials.
Waste recovery - the use of waste that has lost its practical value, such as plastics, paper and cardboard, as secondary raw materials (also commonly used to mean destruction of waste).
Information on the collection system for waste electrical and electronic equipment
- ■Waste electrical and electronic equipment must not be disposed of with other waste.
- ■The collection of incomplete electrical and electronic equipment and parts from waste equipment is prohibited.
- ■A distributor delivering equipment intended for households to a purchaser must collect waste household equipment free of charge at the place of delivery, provided that the waste equipment is of the same type and performs the same function as the equipment delivered.
- ■You can hand over waste equipment to a waste equipment collector, a treatment facility or a municipal waste collector in your municipality.
- ■Information about collection points is available on the BIP public information websites of regional, city and municipal offices.
Service and documents
Before submitting a service request, prepare:
- ■Model - shown on the product nameplate and on the invoice.
- ■Serial number - if there is none, provide the production number (e.g. 11/2025), usually found on the underside of the product.
- ■Proof of purchase - an invoice or receipt from an authorised distributor.
- ■Description of the fault - what happens, when it started and under what conditions.
You can submit a service request at wipcool.pl/serwis. The warranty terms are also available there.