
 Distribution PL · 4REF
Wipcool MDG-1 user manual
Read the entire manual before first use. Keep it for as long as you use the device.
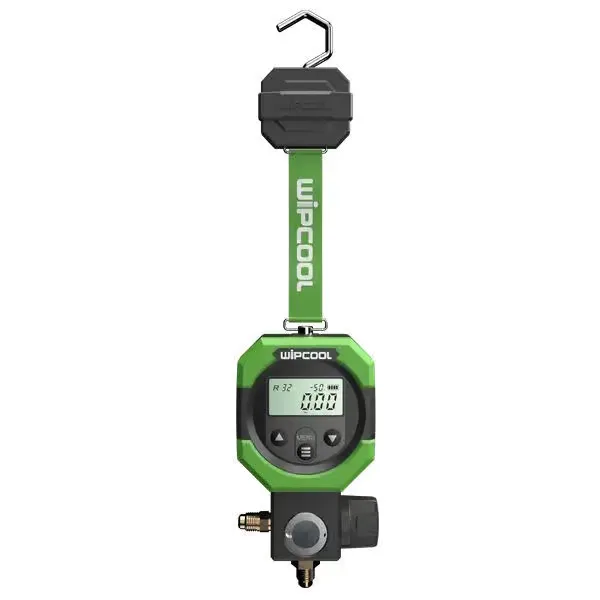
Wipcool MDG-1 user manual
The MDG-1 is a digital pressure gauge for measuring pressure during servicing, evacuation and charging of refrigeration systems. It also displays the evaporation temperature of the selected refrigerant.
The user manual is an integral part of the product. Please read this manual carefully and follow all instructions closely.
General information
Wipcool products are designed for professional use by qualified air conditioning and refrigeration engineers. As the manufacturer, Wipcool stipulates that our devices should only be operated by suitably qualified and trained personnel.
- ■Observe all local safety regulations and general safety standards when using the Wipcool MDG-1 Digital Pressure Gauge.
- ■Keep the user manual near the device so that personnel can access it easily at all times.
- ■Before use, qualified personnel should read the user manual carefully and understand all instructions it contains.
- ■The manufacturer accepts no liability for any damage resulting from improper use, failure to follow the user manual, lack of personnel qualifications or any unauthorised modifications to the device.
- ■The general terms of sale set out in the sales documents apply.
Symbols and conventions
Symbols and markings used on the device and in the manual:
- 01
 Warning - read the text in the box next to the symbol.
- 02
 Low temperature warning. Contact with refrigerant can cause frostbite.
- 03
 Notice - risk of damage to the device or incorrect results.
- 04
 Indicates that the product meets the health, safety and environmental standards applicable in the European Union.
- 05RoHSThe product meets the requirements for restricting the use of hazardous substances.
- 06
 Do not dispose of the device with household waste.
Safety information
- ■Protect the gauge from harmful or corrosive substances, especially ammonia.
- ■Handle refrigerant in accordance with local environmental regulations. Do not release refrigerant into the atmosphere. Recover residual refrigerant from the hoses and gauge using a refrigerant recovery machine.
If refrigerant comes into contact with your eyes, immediately rinse them with plenty of water and seek medical advice.
Technical specifications
Device diagram
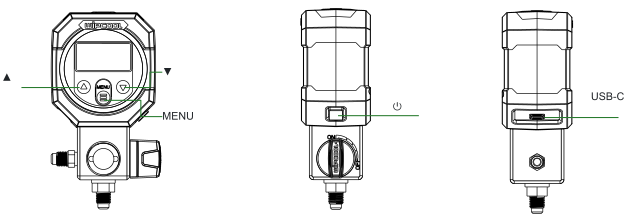
| Component | Function |
|---|---|
| ⏻ (On/off) | Power button. |
| MENU | Backlight and settings button. |
| ▲ (Increase), ▼ (Decrease) | Selection buttons in settings. |
| USB-C port | For charging the battery. |
| Left connection | For connecting a hose to the low-side or high-side service port of the system. |
| Bottom connection | For connecting a refrigerant cylinder, vacuum pump or refrigerant recovery machine. |
| Valve knob | Opens or closes the gauge valve; ON and OFF positions. |
Contents
| Item | Quantity |
|---|---|
| MDG-1 gauge | 1 pc. |
| User manual | 1 pc. |
| USB-C charging cable | 1 pc. |
After unpacking, check that the set is complete and in good condition. Report any missing or damaged items to the seller.
Transport and storage
- ■Transport the gauge in its original packaging.
- ■Store the gauge in a dry place, away from direct sunlight and heat sources.
Connection
Zero the gauge before connecting it.
Air conditioning system connection diagram
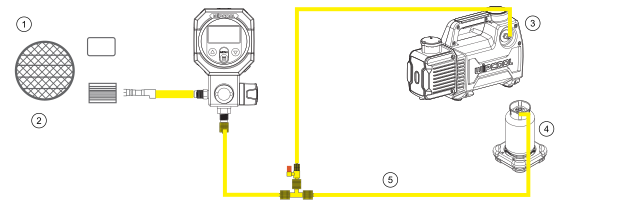
| No. | Description |
|---|---|
| 1 | Air conditioning system |
| 2 | Low-side or high-side connection |
| 3 | Vacuum pump |
| 4 | Refrigerant cylinder |
| 5 | Refrigerant charging scale |
In the diagram, the bottom connection of the gauge leads through a T-piece to the vacuum pump and the refrigerant cylinder positioned on the scale.
Operation
Switching on and backlight
- 01Press the On/off button. The gauge will display the current pressure.
- 02Briefly press MENU to switch the backlight on or off.
The backlight switches off after 3 min of inactivity. The gauge switches off after 15 min of inactivity; the automatic switch-off function does not operate during pressure measurement.
Settings
- 01With the gauge switched on, hold MENU for 3 s to enter settings. The refrigerant selection field will start flashing.
- 02Use ▲ and ▼ to select the refrigerant. Briefly press MENU to move to the flashing pressure unit field.
- 03Use ▲ and ▼ to select the pressure unit. Briefly press MENU to move to the flashing temperature unit field.
- 04Use ▲ and ▼ to select the temperature unit. Briefly press MENU again to return to refrigerant selection.
- 05Hold MENU for 3 s to save the settings and exit.
After 20 s of inactivity, the settings are saved automatically and the gauge exits settings mode.
Operating the gauge valve
- ■To open the valve, turn the knob 90° anticlockwise to the ON position.
- ■To close the valve, turn the knob 90° clockwise to the OFF position.
Zeroing
The gauge may need to be zeroed after a change in ambient temperature or atmospheric pressure.
- 01Before connecting the hoses, leave both connections open to the atmosphere and set the valve knob to ON to equalise the pressure inside the gauge with atmospheric pressure.
- 02With the gauge switched on, press ▲ and ▼ simultaneously. The display should show ‘0.0’.
Switching off the gauge
Press the On/off button to switch off the gauge.
Maintenance
Cleaning the gauge and connections
When necessary, wipe the housing and connections with a damp cloth. You may use a mild detergent to clean the housing.
Checking the hoses
Check the condition of the hoses before each use and replace them if necessary.
Charging the battery
Charge the built-in battery regularly through the USB-C port. If the battery indicator flashes, follow the instructions in the ‘TROUBLESHOOTING’ section.
| Indication | Charge level |
|---|---|
| Full indicator | 100% |
| Three segments | Over 75% |
| Two segments | Over 50% |
| One segment | Over 25% |
| Empty indicator | 0% - battery discharged |
Troubleshooting
| Problem | Possible cause | Solution |
|---|---|---|
| Flashing battery indicator | Low battery charge | Charge the battery through the USB-C port. |
| Code | Meaning | Solution |
|---|---|---|
| E1 | Maximum measurement range exceeded | Stop the measurement. Use the gauge only within its measurement range: pressure 0–55 bar, vacuum approximately -1 to 0 bar. |
| E2 | Faulty pressure sensor | Have the device repaired by the service centre - submit a request at wipcool.pl/serwis. |
Waste electrical and electronic equipment
- 01The crossed-out bin symbol means that the device must not be disposed of with other waste at the end of its life.
Under applicable regulations on waste electrical and electronic equipment, products marked with the separate collection symbol must not be placed with other municipal waste. Because they contain harmful substances, electronic products that are not sorted separately can be hazardous to the environment and human health. Proper separate collection of waste electrical and electronic equipment prevents adverse effects on the environment.
By taking waste equipment to a collection point, you contribute to its reuse, recycling and recovery.
Recycling - one method of protecting the environment. The process of recovering substances from waste that can be reused as raw materials.
Waste recovery - the use of waste that has lost its practical value, such as plastics, paper and cardboard, as secondary raw materials (the term is also commonly used to mean destruction).
Information on the collection system for waste electrical and electronic equipment
- ■Waste electrical and electronic equipment must not be disposed of with other waste.
- ■The collection of incomplete electrical and electronic equipment and parts from waste equipment is prohibited.
- ■A distributor delivering equipment intended for households to a purchaser is required to collect waste household equipment free of charge at the place of delivery, provided that the waste equipment is of the same type and performs the same function as the equipment delivered.
- ■You can hand over waste equipment to a waste equipment collector, a treatment facility or a municipal waste collector in your municipality.
- ■Information on collection points is available on the BIP websites of regional, city and municipal offices.
Batteries and rechargeable batteries
- 01The crossed-out bin symbol on a battery or rechargeable battery means that it must be collected separately from other waste at the end of its life. It must not be disposed of with municipal waste.
- ■Take used batteries and rechargeable batteries to a collection point. If possible, remove them from the device before taking it for collection.
- ■Substances contained in batteries can harm the environment and health, especially if a battery is damaged or leaking. Separate collection allows them to be processed safely and raw materials to be recovered.
- ■The Cd or Pb marking below the bin symbol means that the battery contains more than 0.002% cadmium or more than 0.004% lead.
The MDG-1 gauge battery is built in - do not remove it yourself. Take the gauge to a collection point together with the battery.
Service and documents
Before submitting a request, prepare:
- ■Model - shown on the device nameplate and on the invoice.
- ■Serial number - if there is none, provide the production number (e.g. 11/2025), usually found on the underside of the device.
- ■Proof of purchase - an invoice or receipt from an authorised distributor.
- ■Description of the fault - what happens, when it started and under what conditions.
You can submit a service request at wipcool.pl/serwis. You will also find the warranty terms there.