
 Distribution PL · 4REF
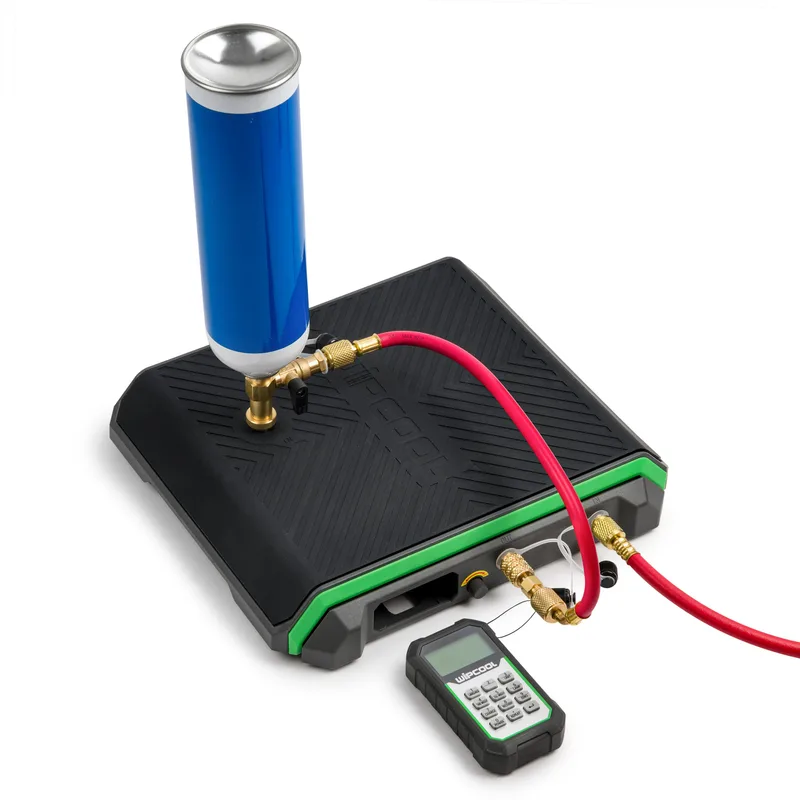
Wipcool MRS60/MRS120 user manual
The Wipcool MRS60/MRS120 programmable refrigerant charging scale measures mass and controls refrigerant charging and recovery in refrigeration and air conditioning systems. It has a wireless remote control and a solenoid valve that controls refrigerant flow.
The user manual is an integral part of the product. Please read this manual carefully and follow all instructions strictly.
General information
Wipcool products are designed for professional use by qualified air conditioning and refrigeration engineers. As the manufacturer, Wipcool stipulates that our equipment should only be operated by suitably qualified and trained personnel.
- ■Comply with all local safety regulations and general safety standards when using the Wipcool MRS60/MRS120 refrigerant charging scale.
- ■The user manual should be kept near the device so that personnel can access it easily at any time.
- ■Before use, qualified personnel should read the user manual carefully and understand all the instructions it contains.
- ■The manufacturer accepts no liability for any damage resulting from improper use, failure to follow the user manual, unqualified personnel or any unauthorised modifications to the device.
- ■The general terms and conditions of sale contained in the sales documents apply.
Symbols and conventions
Signs and symbols used on the device and in the manual:
- 01
 Warning - read the text in the box next to the symbol.
- 02
 Low temperature - risk of frostbite.
- 03
 Hot surface - allow to cool before touching.
- 04
 Flammable material - risk of fire.
- 05
 Notice - risk of damage to the device or an incorrect result.
- 06
 Tip - operating advice.
- 07
 Before starting work, read all safety and installation instructions carefully.
- 08
 Indicates that the product meets the health, safety and environmental standards applicable in the European Union.
- 09RoHSThe product meets the requirements for restricting the use of hazardous substances.
- 10
 Do not dispose of the scale with household waste.
CHARGE indicates charging, RECOVERY indicates recovery, STABLE indicates a stable reading, OPEN indicates that the solenoid valve is open, and OVERLOAD indicates that the scale is overloaded. Button names correspond to the labels on the remote control; ENTER indicates the button with the return arrow.
Safety information
- ■When handling refrigerants, comply with the regulations governing refrigeration and air conditioning systems.
- ■Do not use the scale if the housing, display, hoses or remote control are damaged. Use the manufacturer's original accessories.
- ■Do not exceed the maximum load of the scale. Do not sit, stand or lean on the platform. Overloading can damage the sensor.
- ■Protect the scale from heavy impacts, vibrations, moisture and excessive dust. Do not use it at high temperatures or in a strong magnetic field.
- ■Do not immerse the scale, remote control or hoses in water or other liquids - this can damage the electronics.
- ■Do not dismantle the device's electronic components yourself.
Technical specifications
| Parameter | MRS60 | MRS120 |
|---|---|---|
| Maximum load | 60 kg | 120 kg |
| Resolution | 4 g / 0.2 oz / 0.01 lb | 8 g / 0.4 oz / 0.02 lb |
| Accuracy | 0.05% | 0.05% |
| Units of measurement | kg / oz / lb | kg / oz / lb |
| Supported refrigerants | A2L; A3 in manual modes only | A2L; A3 in manual modes only |
| Minimum charging / recovery mass | 50 g | 50 g |
| Minimum weighing mass | 50 g | 50 g |
| Platform power supply | 3 × Li-ion 18650 battery, 3.7 V / 2400 mAh | 3 × Li-ion 18650 battery, 3.7 V / 2400 mAh |
| Platform battery charging | In the platform, via USB-C socket | In the platform, via USB-C socket |
| Remote control power supply | 2 × AAA 1.5 V alkaline battery | 2 × AAA 1.5 V alkaline battery |
| Platform operating time | Up to 60 h | Up to 60 h |
| Remote control operating time | Up to 30 h | Up to 30 h |
| Remote control range | 5 m | 5 m |
| Operating humidity | Up to 85% RH at 45 °C, non-condensing | Up to 85% RH at 45 °C, non-condensing |
| Operating temperature | 0–50 °C | 0–50 °C |
| Storage temperature | -10 to +60 °C | -10 to +60 °C |
| Protection class | III | III |
| Platform dimensions (L × W × H) | 335 × 315 × 62 mm | 335 × 315 × 62 mm |
| Device weight | 4.3 kg | 4.3 kg |
Device diagram
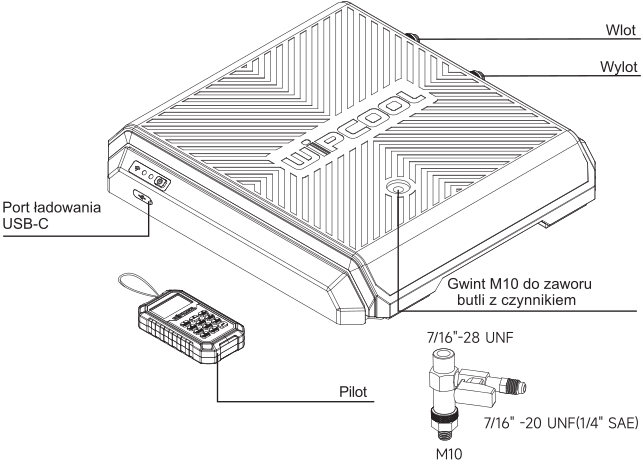
The cylinder valve is attached to the platform using the M10 thread. The cylinder connection has a 7/16"-28 UNF thread and the hose connection has a 1/4" SAE (7/16"-20 UNF) thread.
Display
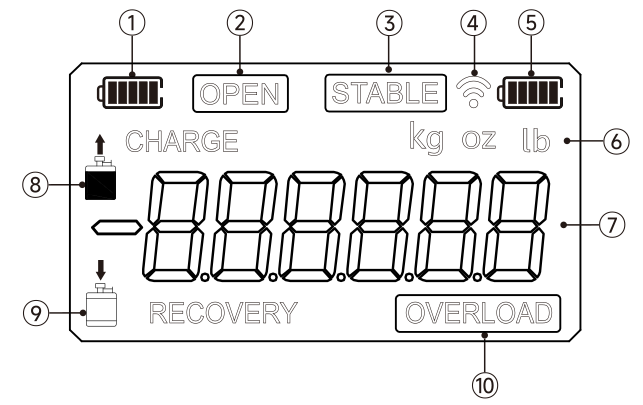
| No. | Meaning |
|---|---|
| 1 | Platform battery charge level |
| 2 | Solenoid valve open - OPEN |
| 3 | Stable reading - STABLE |
| 4 | Connection to the remote control |
| 5 | Remote control battery level |
| 6 | Unit of measurement |
| 7 | Measured value or setpoint |
| 8 | Charging mode - CHARGE |
| 9 | Recovery mode - RECOVERY |
| 10 | Scale overload - OVERLOAD |
Platform indicators and button
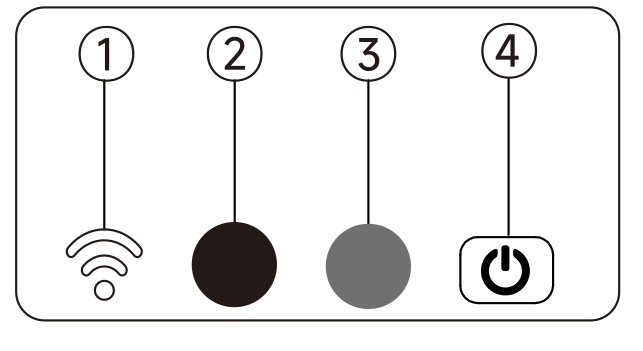
| No. | Item | Meaning |
|---|---|---|
| 1 | Connection indicator | Steady light - connected to the remote control; slow flashing - no connection or connection lost. |
| 2 | Charging indicator | Steady light - fully charged; slow flashing - charging in progress. |
| 3 | Power indicator | Steady light - platform on; slow flashing - batteries almost discharged, charge them. |
| 4 | Platform power button | Press and hold to switch the platform on or off. |
Button functions
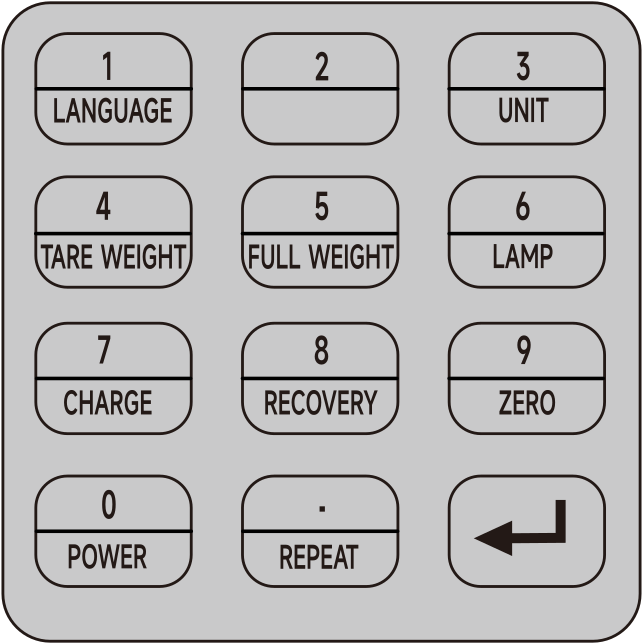
| Button | Function |
|---|---|
| 0 / POWER | Press briefly to switch on the remote control. Press and hold for 3 s to switch it off. |
| 1 / LANGUAGE | Press briefly several times to select the language and confirm with ENTER. |
| 2 / calibration | Press and hold to open the calibration password screen. |
| 3 / UNIT | Press briefly to change the unit: kg, oz or lb. |
| 4 / TARE WEIGHT | Set the empty cylinder mass. |
| 5 / FULL WEIGHT | Set the full cylinder mass. |
| 6 / LAMP | Press briefly to switch the backlight on or off. It switches off automatically after 30 s. Press and hold for 3 s to keep the backlight on continuously; press briefly to switch it off. |
| 7 / CHARGE | Press briefly to switch to setting the charging mass in CHARGE mode. |
| 8 / RECOVERY | Press briefly to switch to setting the recovery mass in RECOVERY mode. |
| 9 / ZERO | Press briefly to zero the reading. Press and hold for 3 s to clear the CHARGE, RECOVERY, empty cylinder mass and full cylinder mass settings. |
| . / REPEAT | Press briefly to repeat the last charging or recovery setting. Press twice to cancel the repeat. |
| ENTER - return arrow | Starts charging or recovery after the mass is entered. Press again to end the process. |
Package contents
| Item | Quantity |
|---|---|
| MRS60 or MRS120 scale | 1 pc. |
| Li-ion 18650 batteries for the platform | 3 pcs. |
| Cylinder valve with M10 mounting thread | 1 pc. |
| Carry bag | 1 pc. |
| User manual | 1 pc. |
The platform batteries are supplied with the kit by 4REF. The remote control batteries and charger are not included. After unpacking, check that the kit is complete and in good condition. Report any missing or damaged items to the seller.
Transport and storage
Transport
- ■Transport the scale in its original packaging or protect it against mechanical damage.
- ■Protect the platform, display and electronics from drops, heavy shocks and pressure. Do not place heavy objects on the platform.
- ■Secure the hoses, remote control and accessories against movement. Protect the device from moisture, precipitation and excessive dust.
Storage
- ■Store the scale in a dry, clean and ventilated place at a temperature of -10 to +60 °C.
- ■Protect it from direct sunlight and heat sources. Do not store it near corrosive or flammable substances, in areas where there is a risk of explosion or in a strong magnetic field.
- ■Remove the load from the platform for storage. Before an extended period of non-use, remove the batteries from the platform and the remote control.
- ■Before using the device again, check the condition of the device and hoses and check that its functions work.
Preparing for use
- 01Check the condition of the platform, remote control, hoses and solenoid valve. Install the 3 supplied Li-ion 18650 batteries in the platform according to the polarity markings, and install 2 AAA 1.5 V alkaline batteries in the remote control.
- 02Place the unloaded platform on a stable, level and hard surface, free from vibrations and shocks.
- 03Press and hold the platform power button. The green indicator will light steadily. Briefly press POWER on the remote control; the remote control will automatically search for an available device. Wait until the connection indicator lights steadily.
- 04Select the language using LANGUAGE and confirm with ENTER. Select the unit (kg, oz or lb) using UNIT.
Operation
In automatic modes, flow passes through the scale's solenoid valve; in manual modes, it is controlled by the cylinder valve, bypassing the solenoid valve.
Weighing
- 01With the platform empty, zero the reading using ZERO.
- 02Place the cylinder or object to be weighed centrally on the platform. Read the mass when the STABLE indicator appears.
Cylinder mass alarms
If you set the empty cylinder mass (TARE WEIGHT) before charging, the scale will sound an alarm when the cylinder mass falls below this value. The mass of refrigerant added will be displayed and the icon will flash. Press ENTER to end charging and return to weighing.
If you set the full cylinder mass (FULL WEIGHT) before recovery, the solenoid valve will shut off the flow and an alarm will sound when 80% of the setpoint is reached. The mass remaining to be recovered will be displayed and the icon will flash. Press ENTER to end recovery and return to weighing.
Automatic charging
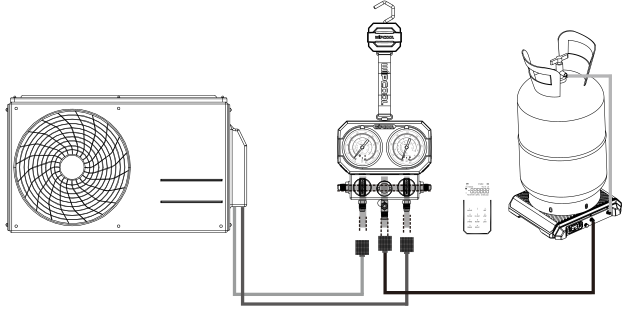
- 01Connect the hoses as shown in figure 5 and check that the connections are correct and leak-tight.
- 02Place the refrigerant cylinder on the platform and wait for the reading to stabilise.
- 03Press CHARGE and enter the mass of refrigerant to be charged - minimum 50 g. Confirm with ENTER. The solenoid valve will open and refrigerant will begin to flow.
- 04Once the set amount of refrigerant has been transferred, the solenoid valve will automatically shut off the flow.
Charging with an inverted cylinder
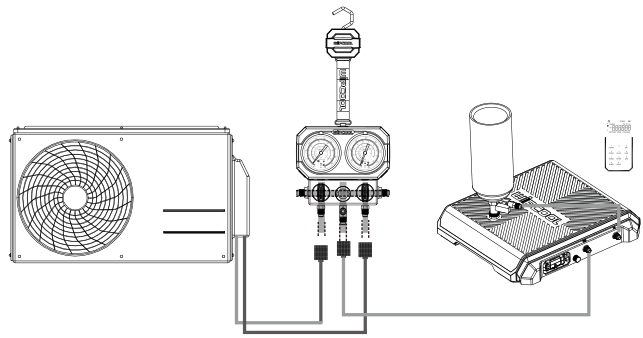
- 01Fit the cylinder valve into the platform's M10 thread and connect the inverted cylinder and hose to it using the threads shown in figure 1.
- 02Connect the remaining hoses as shown in figure 6 and check that the connections are correct and leak-tight. Wait for the reading to stabilise.
- 03Press CHARGE and enter the mass of refrigerant to be charged - minimum 50 g. Confirm with ENTER. The solenoid valve will open and refrigerant will begin to flow.
- 04Once the set amount of refrigerant has been transferred, the solenoid valve will automatically shut off the flow.
Manual charging
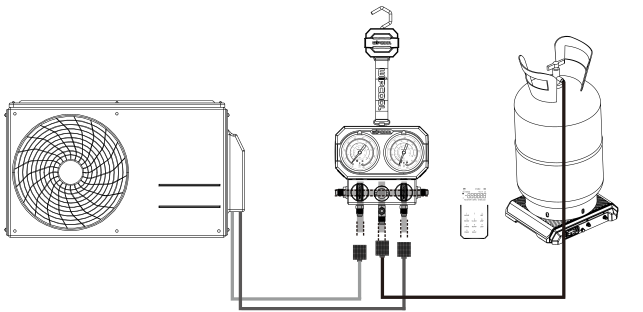
- 01Connect the hoses as shown in figure 7 and check that the connections are correct and leak-tight.
- 02Place the refrigerant cylinder on the platform and wait for the reading to stabilise.
- 03Press CHARGE and enter the mass of refrigerant to be charged. Confirm with ENTER. Slowly open the cylinder valve by hand to start the flow.
- 04Monitor the change in mass throughout charging. Once the set amount of refrigerant has been transferred, the scale will sound a signal; immediately close the cylinder valve by hand.
Automatic recovery
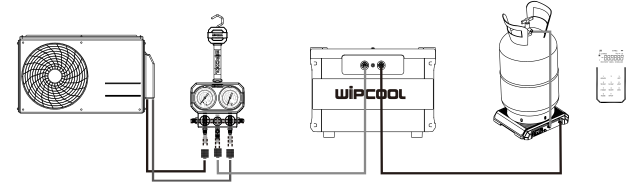
- 01Connect the hoses as shown in figure 8 and check that the connections are correct and leak-tight.
- 02Place the recovery cylinder on the platform and wait for the reading to stabilise.
- 03Press RECOVERY and enter the mass of refrigerant to be recovered - minimum 50 g. Confirm with ENTER. The solenoid valve will open and refrigerant will begin to flow.
- 04Once the set amount of refrigerant has been transferred, the solenoid valve will automatically shut off the flow.
Manual recovery
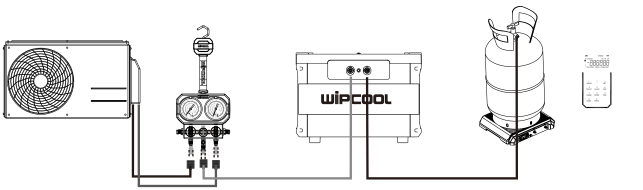
- 01Connect the hoses as shown in figure 9 and check that the connections are correct and leak-tight.
- 02Place the recovery cylinder on the platform and wait for the reading to stabilise.
- 03Press RECOVERY and enter the mass of refrigerant to be recovered. Confirm with ENTER. Open the cylinder valve by hand to start the flow.
- 04Monitor the change in mass throughout recovery. Once the set amount of refrigerant has been transferred, the scale will sound a signal; immediately close the cylinder valve by hand.
After charging or recovery is complete, the display shows the gross cylinder mass. Example: with an initial gross cylinder mass of 10 kg, charging the system with 1 kg gives a final reading of 9 kg; recovering 1 kg into the cylinder gives 11 kg. To enter a 1 kg setpoint, press in sequence: CHARGE or RECOVERY, 1, ENTER.
Small variations in the mass reading may occur during charging or recovery. They do not indicate a scale fault.
Finishing work
After completing the work, close the system valves and switch off the platform and remote control. Clean the scale and put it in the carry bag.
Calibration
The scale is factory calibrated. If the readings are incorrect, you can perform field calibration. Place the empty platform on a stable, level and hard surface, free from vibrations.
Certified calibration weights are recommended. The calibration weight range is 1–60 kg for MRS60 and 1–120 kg for MRS120. If you do not have a calibration weight, you can use an object of known mass, but this may reduce weighing accuracy. The greater the difference between the mass of the object being weighed and the mass of the object used for calibration, the greater the deviation.
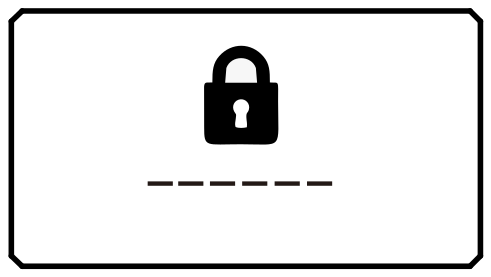
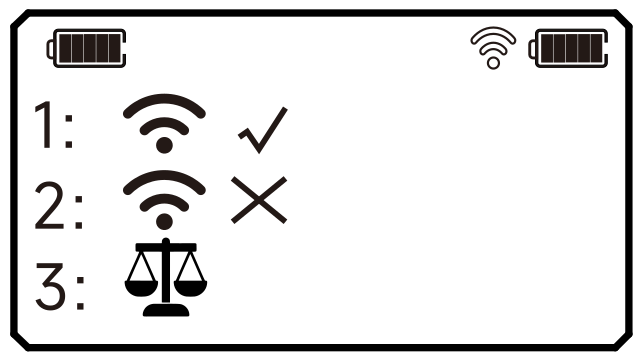
- 01Switch on the platform and remote control, then wait for them to connect. Press and hold button 2 on the remote control to open the password screen.
- 02Enter code 123456 and confirm with ENTER to enter the pairing and calibration menu. Select option 3 - calibration.
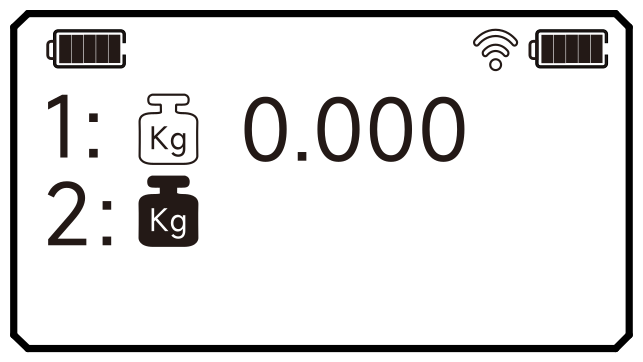
- 03Place the calibration weight or object of known mass on the platform, select option 2 and enter its mass in kg, e.g. 5.0 kg. Confirm with ENTER.
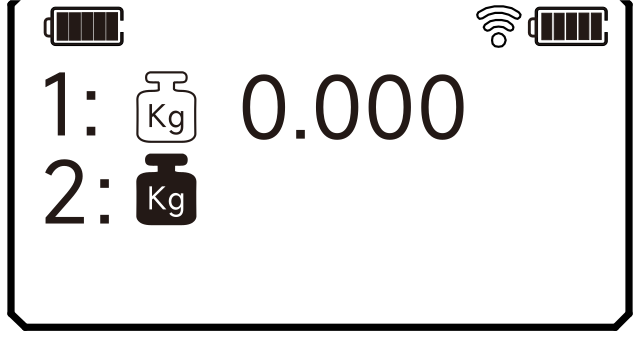
- 04Remove the load from the platform. Select option 1 to calibrate the zero point, then press ENTER to exit to weighing.
- 05Check the reading using the calibration weight or object used for calibration.
Maintenance
General recommendations
Regularly check the condition of the platform, hoses, solenoid valve and remote control. Keep the platform clean.
Charging the platform batteries
The batteries are charged in the platform via the USB-C socket. Connect the charger to this socket. The red indicator flashes slowly during charging and lights steadily when fully charged. Charge the batteries when the green power indicator starts flashing slowly.
Cleaning
- 01Switch off the platform and remote control. If a charger is connected to the USB-C socket, disconnect it.
- 02Remove dirt from the platform and housing with a soft, slightly damp cloth. If necessary, use a small amount of mild detergent.
- 03Do not use solvents, petrol, alcohol or abrasive cleaners.
Troubleshooting
| Problem | Possible cause | Solution |
|---|---|---|
| The device does not start | Platform batteries discharged | Charge the batteries via the platform's USB-C port. |
| The device does not start | Batteries incorrectly installed | Check that the batteries are inserted according to the polarity markings. |
| The device does not start | Remote control batteries discharged | Replace the AAA batteries in the remote control. |
| No communication between the platform and the remote control | Remote control switched off | Switch on the remote control using the POWER button. |
| No communication between the platform and the remote control | Distance too great | Move the remote control closer to the platform. |
| No communication between the platform and the remote control | Remote control batteries discharged | Replace the AAA batteries in the remote control. |
| No communication between the platform and the remote control | Wireless connection lost | Switch the remote control and the platform off and on again. |
| Incorrect weight readings | Uneven surface | Place the scale on a stable, level surface. |
| Incorrect weight readings | Platform loaded during zeroing | Remove the load and zero the reading. |
| Incorrect weight readings | Calibration required | Carry out the procedure in the ‘CALIBRATION’ section. |
| Unstable reading | Vibration or movement of the surface | Move the scale to a stable surface. |
| Unstable reading | Cylinder movement | Place the cylinder centrally and keep it stationary. |
| CHARGE mode does not start | Charge weight not set | Press CHARGE and enter the required refrigerant weight. |
| CHARGE mode does not start | Setting not confirmed | Confirm the setting using the ENTER button. |
| CHARGE mode does not start | Hoses not connected according to the diagram | Make the connections according to figure 5 or 6 for automatic charging, or figure 7 for manual charging. |
| RECOVERY mode does not start | Recovery weight not set | Press RECOVERY and enter the required weight of refrigerant to be recovered. |
| RECOVERY mode does not start | Setting not confirmed | Confirm the setting using the ENTER button. |
| RECOVERY mode does not start | Recovery system incorrectly connected | Check the connections against figure 8 for automatic recovery or figure 9 for manual recovery. |
| Solenoid valve does not shut off the flow | Incorrect process settings | Check the entered charge or recovery weights. |
| Solenoid valve does not shut off the flow | Faulty solenoid valve | Have the valve repaired by the service department - submit a service request at wipcool.pl/serwis. |
| OVERLOAD | Maximum load exceeded | Immediately remove the excess load from the platform. |
| Short operating time | Platform batteries low | Charge the batteries via the platform's USB-C port. |
| Short operating time | Worn-out batteries | Replace the batteries with Li-ion 18650, 3.7 V / 2400 mAh batteries. |
| Unable to calibrate | Incorrect access code | Enter code 123456. |
| Unable to calibrate | No calibration weight | Use a calibration weight or an object of precisely known weight: 1–60 kg for MRS60 or 1–120 kg for MRS120. |
Waste electrical and electronic equipment
- 01The crossed-out wheeled bin symbol means that the device must not be disposed of with other waste at the end of its life.
Under applicable regulations on waste electrical and electronic equipment, products marked with the separate collection symbol must not be disposed of with other municipal waste. Because they contain harmful substances, electronic products that are not collected separately may be hazardous to the environment and human health. Proper separate collection of waste electrical and electronic equipment prevents adverse effects on the environment.
By taking waste equipment to a collection point, the user contributes to its reuse, recycling and recovery.
Recycling - a method of protecting the environment. The process of recovering substances from waste that can be reused as raw materials.
Recovery - the use of waste that has lost its use value, such as plastics, paper and cardboard, as secondary raw materials; the term is also commonly used to mean the destruction of waste.
Information on the collection system for waste electrical and electronic equipment
- ■Waste electrical and electronic equipment must not be disposed of with other waste.
- ■The collection of incomplete electrical and electronic equipment and parts from waste equipment is prohibited.
- ■A distributor supplying equipment intended for households to a purchaser must collect waste household equipment free of charge at the point of delivery, provided that the waste equipment is of the same type and performs the same function as the equipment supplied.
- ■The user may take waste equipment to a waste equipment collector, a treatment facility or a municipal waste collector in the municipality.
- ■Information on collection points is available on the BIP public information websites of regional, city and municipal authorities.
Batteries and rechargeable batteries
- 01The crossed-out wheeled bin symbol on a battery or rechargeable battery means that it must be collected separately from other waste at the end of its life. It must not be disposed of with municipal waste.
- ■Take used batteries and rechargeable batteries to a collection point. If possible, remove them from the device before taking it for collection.
- ■Substances contained in batteries can harm the environment and health, especially if a battery is damaged or leaking. Separate collection allows them to be processed safely and raw materials to be recovered.
- ■The Cd or Pb marking beneath the bin symbol means that the battery contains more than 0.002% cadmium or more than 0.004% lead.
Service and documents
Before submitting a service request, have the following ready:
- ■Model - shown on the device's rating plate and on the invoice.
- ■Serial number - if there is none, provide the production number (e.g. 11/2025), usually found on the underside of the device.
- ■Proof of purchase - an invoice or receipt from an authorised distributor.
- ■Description of the fault - what is happening, since when and under what conditions.
You can submit a service request at wipcool.pl/serwis. You will also find the warranty terms there.