
 Distribution PL · 4REF
Wipcool P12C/P12CT user manual
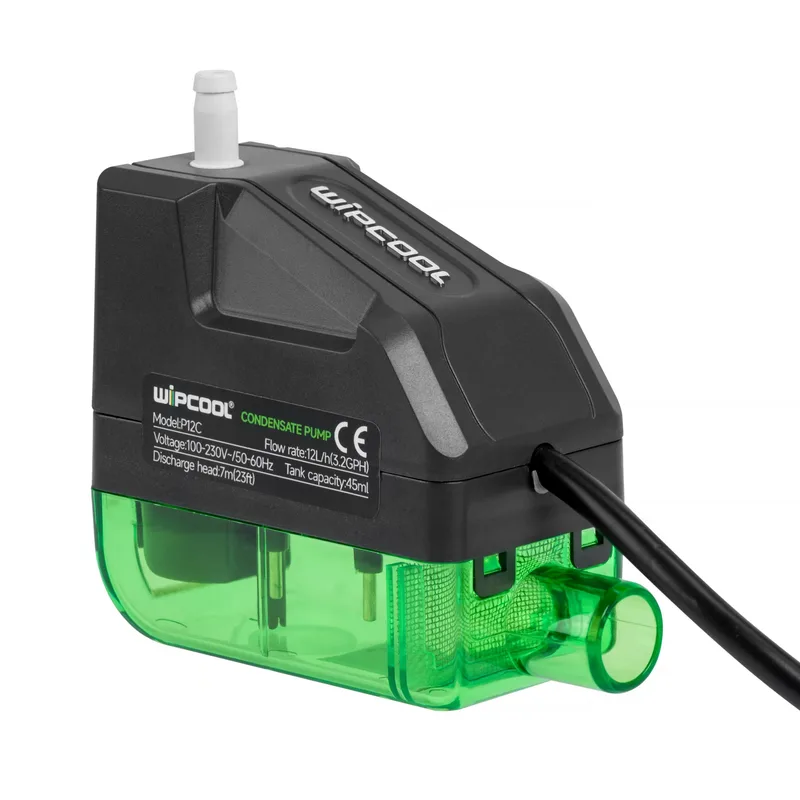
The Wipcool P12C Condensate Pump removes condensate from air conditioners. The P12CT model includes the P12C pump, trunking, an elbow and a wall cover for installation on the left or right side of the indoor unit.
The user manual is an integral part of the product. Please read this manual carefully and follow all instructions strictly.
General information
Wipcool products are designed for professional use by qualified air conditioning and refrigeration technicians. As the manufacturer, Wipcool specifies that our equipment should be operated only by suitably qualified and trained persons.
- ■Observe all local safety regulations and general safety standards when using the Wipcool P12C/P12CT Condensate Pump.
- ■Keep the user manual near the device so that personnel can easily access it at any time.
- ■Before use, qualified personnel should read the user manual carefully and understand all the instructions it contains.
- ■The manufacturer accepts no liability for any damage resulting from improper use, failure to follow the user manual, lack of personnel qualifications or any unauthorised modifications to the device.
- ■The general terms and conditions of sale contained in the sales documents apply.
Symbols and conventions
Signs and symbols used on the device and in the manual:
- 01
 Dangerous voltage - risk of electric shock.
- 02
 Notice - risk of damage to the device or incorrect operating results.
- 03
 Indicates that the product meets the health, safety and environmental standards applicable in the European Union. Applies to the P12C pump.
- 04
 Do not dispose of the device with household waste.
Safety information
- ■Do not install a damaged pump.
- ■The pump is not waterproof. Do not install it outdoors or in a location exposed to flooding.
- ■Do not place electrical devices or valuable items beneath the pump. A leak may damage them.
- ■Coil any excess power and alarm cable so that it is not damaged during installation.
Technical specifications
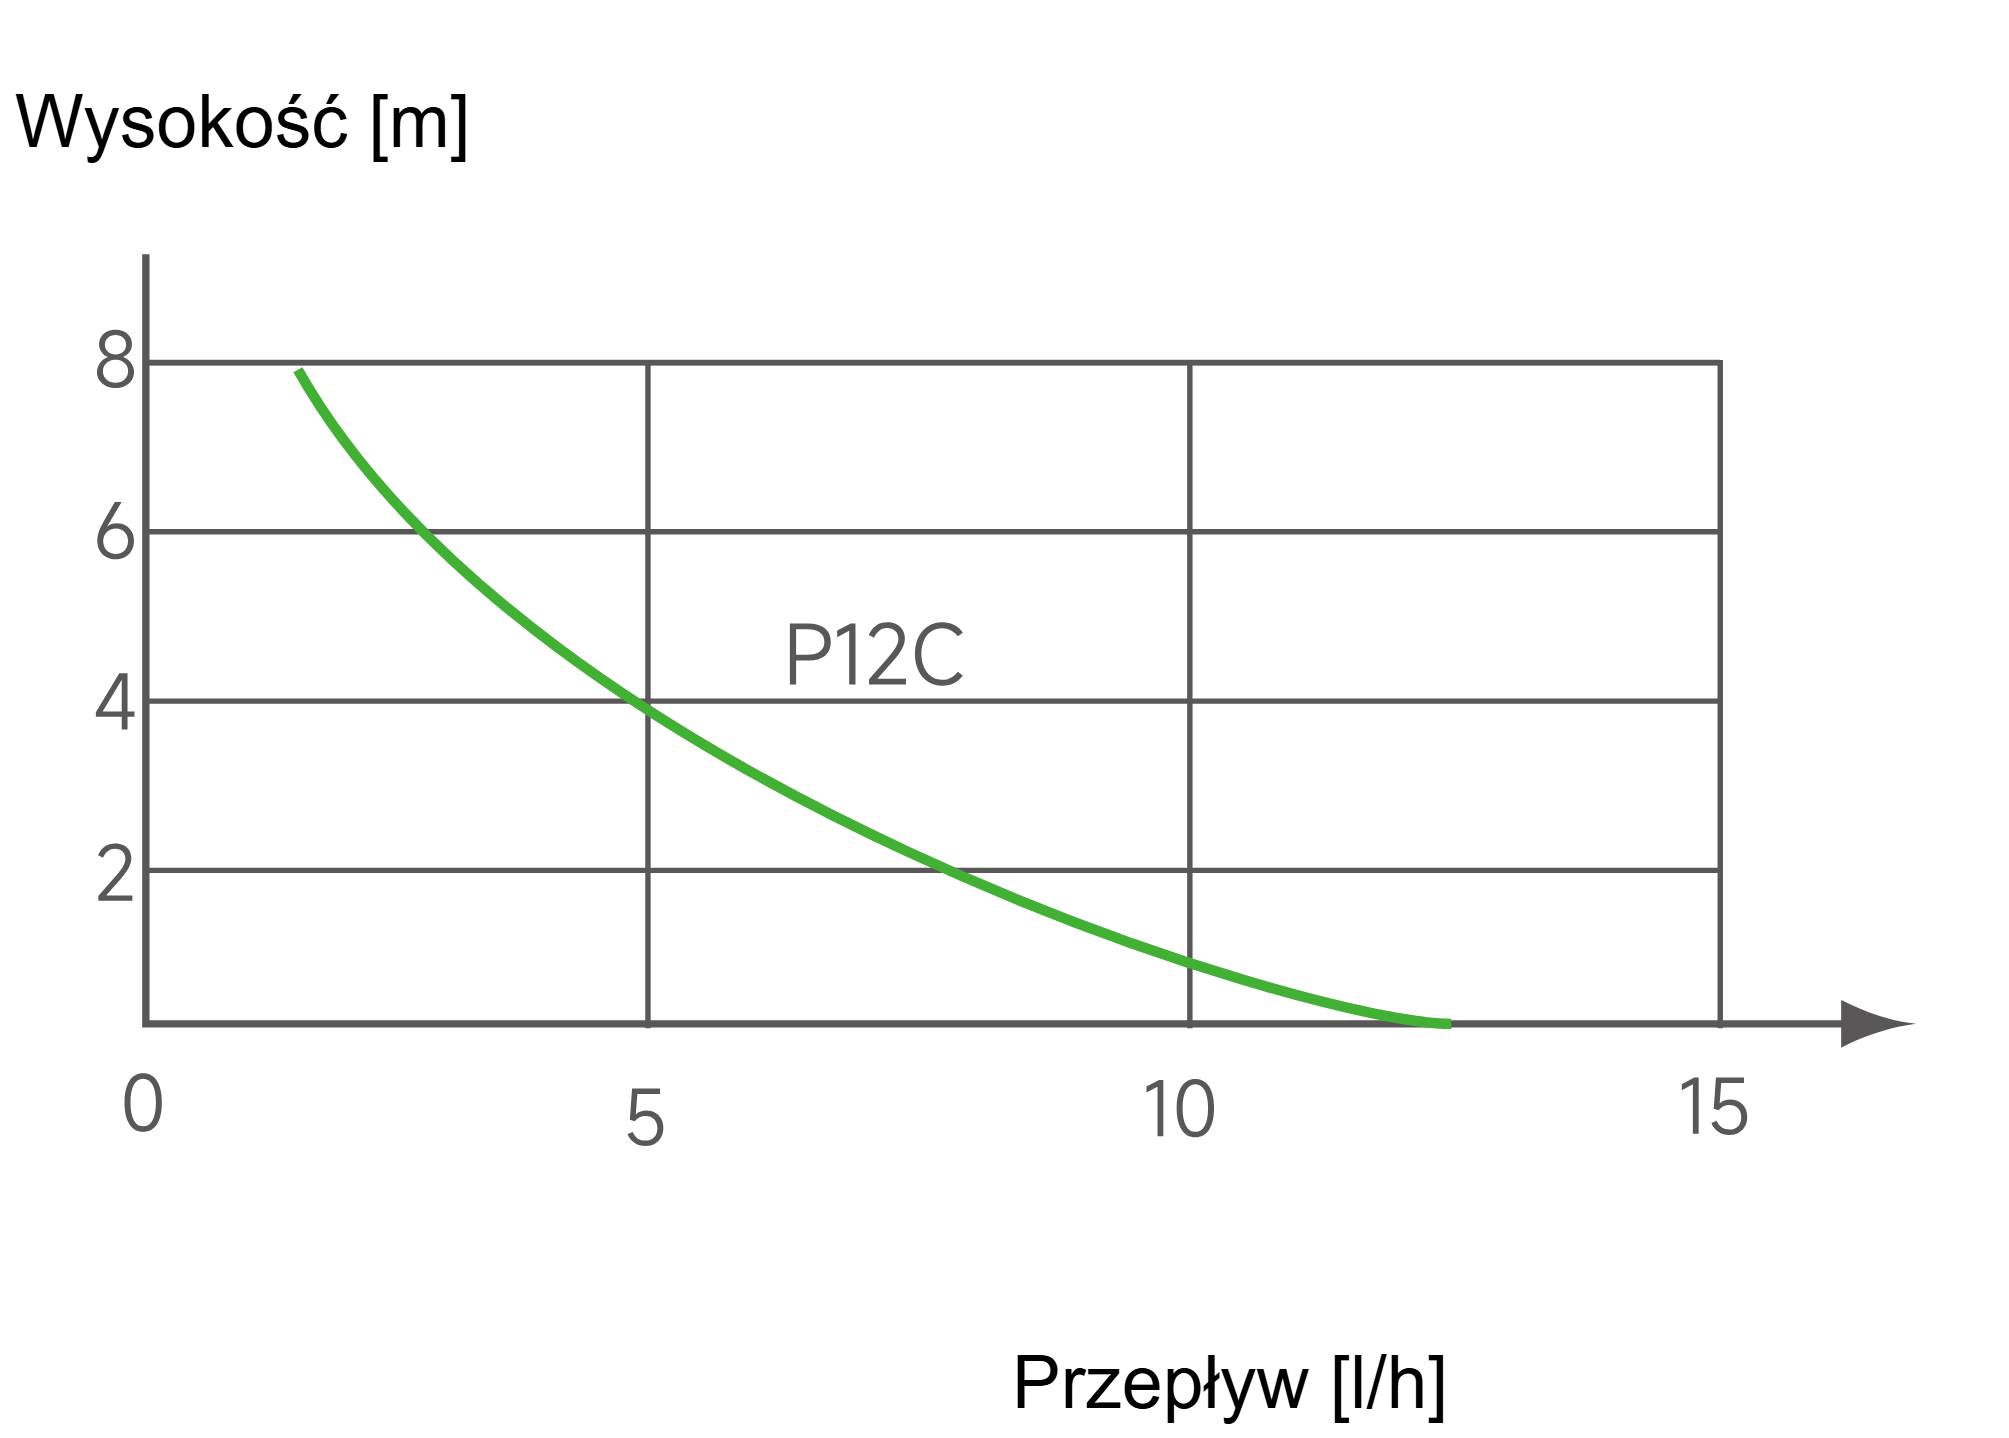
Performance
Device diagram
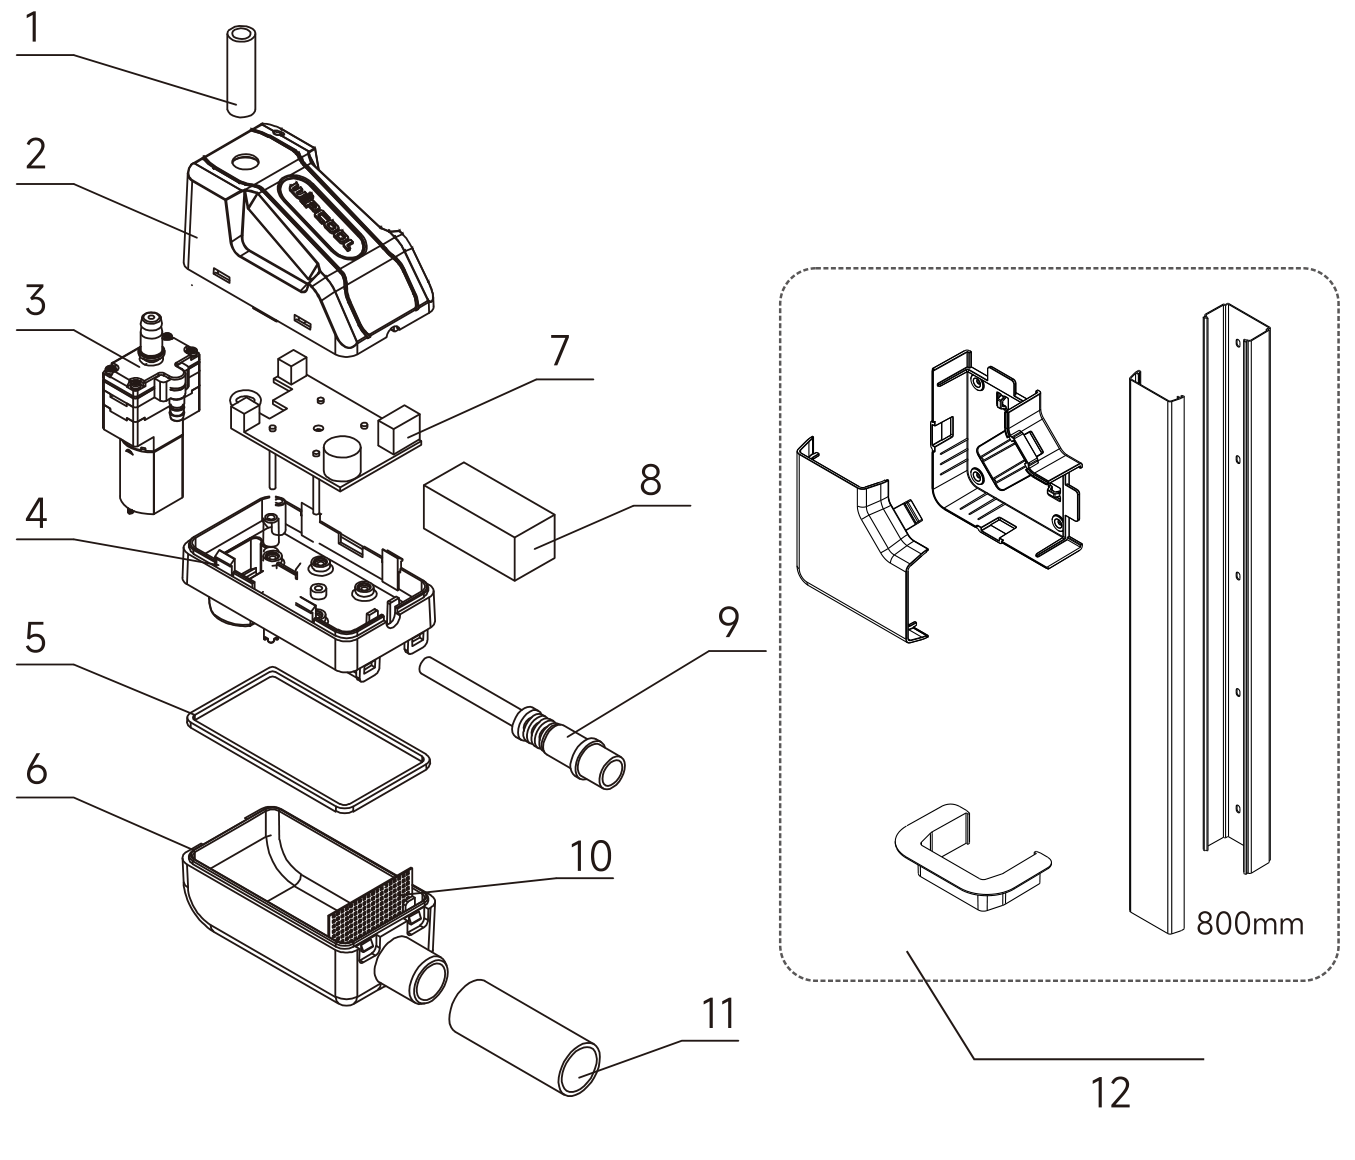
| No. | Name |
|---|---|
| 1 | Outlet connection |
| 2 | Top cover |
| 3 | Pump |
| 4 | Intermediate plate |
| 5 | Sealing ring |
| 6 | Tank |
| 7 | Control board |
| 8 | Power supply module |
| 9 | Four-core power and alarm cable |
| 10 | Mesh filter |
| 11 | Inlet hose |
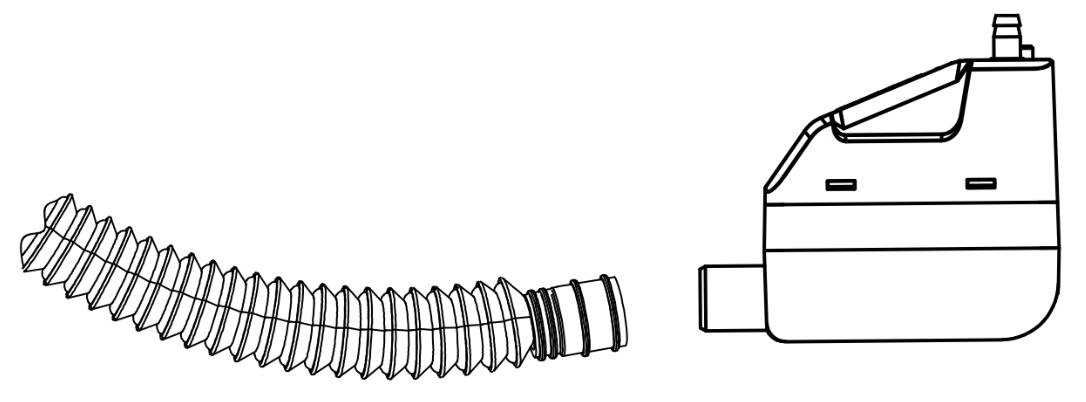
| 12 | Trunking with cover, elbow with cover and wall cover (P12CT) |
Pump dimensions
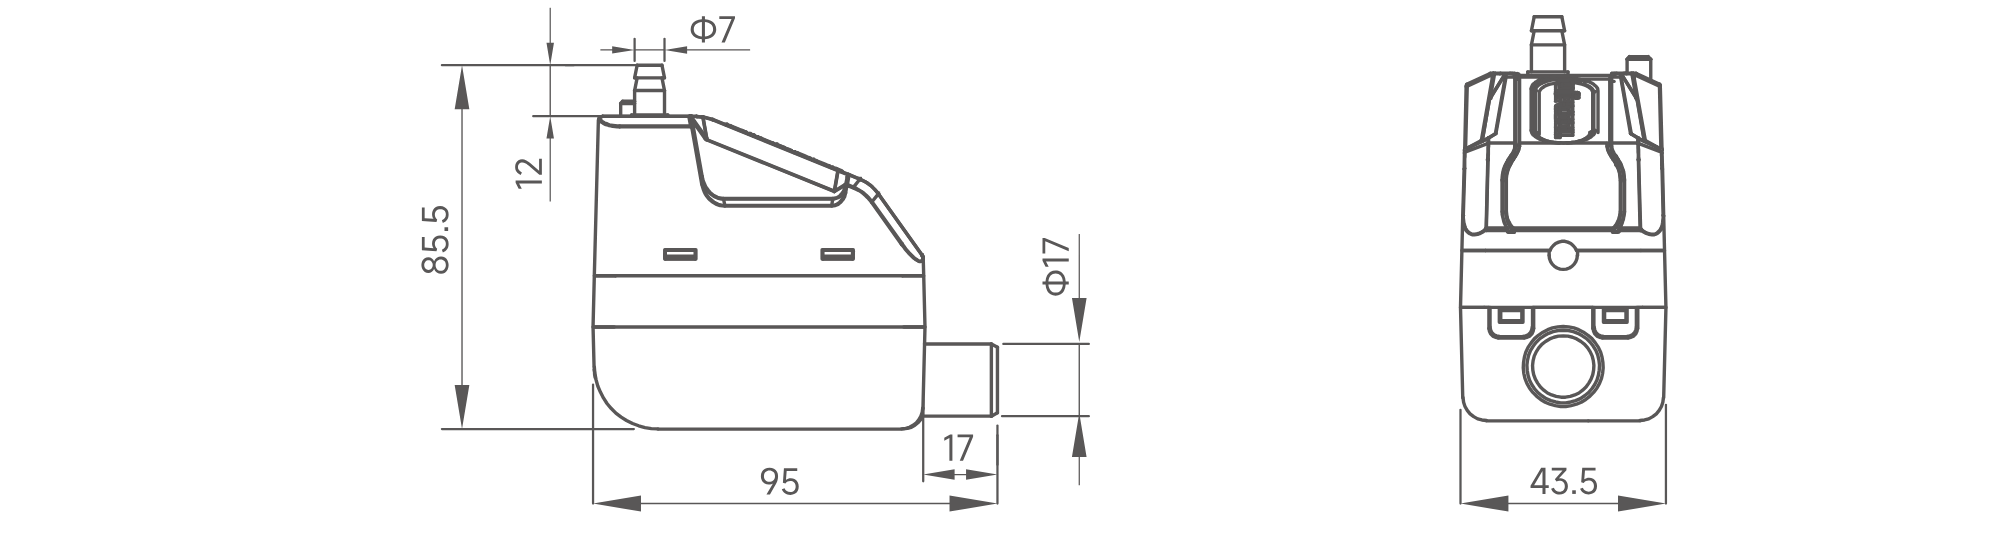
Package contents
After unpacking, check that the package is complete and in good condition. Report any missing or damaged items to the seller.
- ■Pump with power and alarm cable and inlet hose.
- ■Cable ties and hook-and-loop straps for mounting the pump.
- ■Wall plugs and screws.
- ■Rubber reducer and rubber connector.
- ■Metal bracket.
- ■Anti-vibration and anti-condensation rubber cover.
- ■Drain hose.
- ■User manual.
- ■P12CT: also includes 800 mm trunking, elbow with cover, trunking cover and wall cover.
Transport and storage
Transport
- ■Transport the pump in its original packaging. Protect it from impacts, shocks and excessive vibration.
- ■Protect the device from moisture, dust and extreme temperatures. Secure the packaging during transport.
Storage
- ■Store the pump horizontally in a dry, well-ventilated place, away from direct sunlight and heat sources.
- ■Storage temperature: 5–50 °C.
Installation
For the P12C, secure the pump in the chosen location with a hook-and-loop strap and level the tank. For the P12CT, install the trunking and elbow first.
Trunking and elbow - P12CT
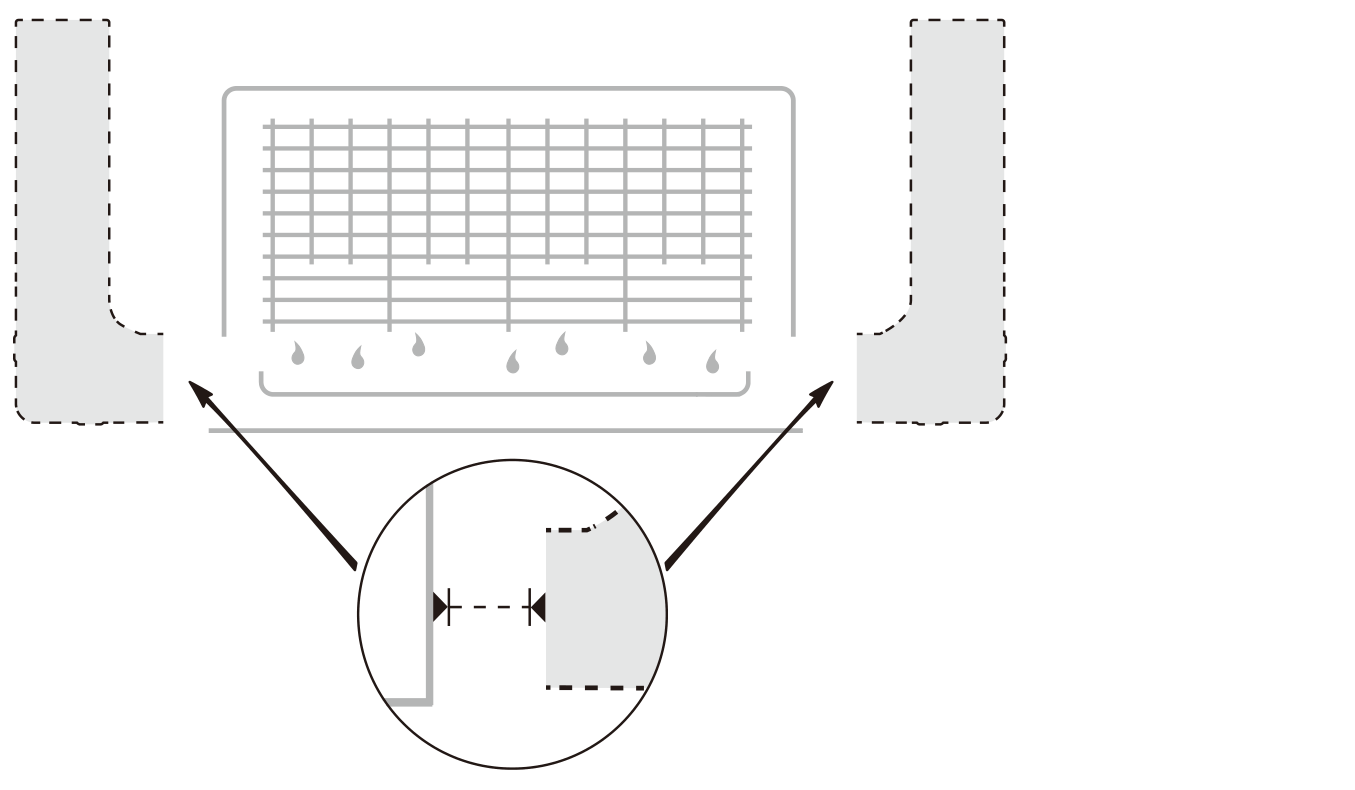
- 01Choose a location on the left or right side of the air conditioner.
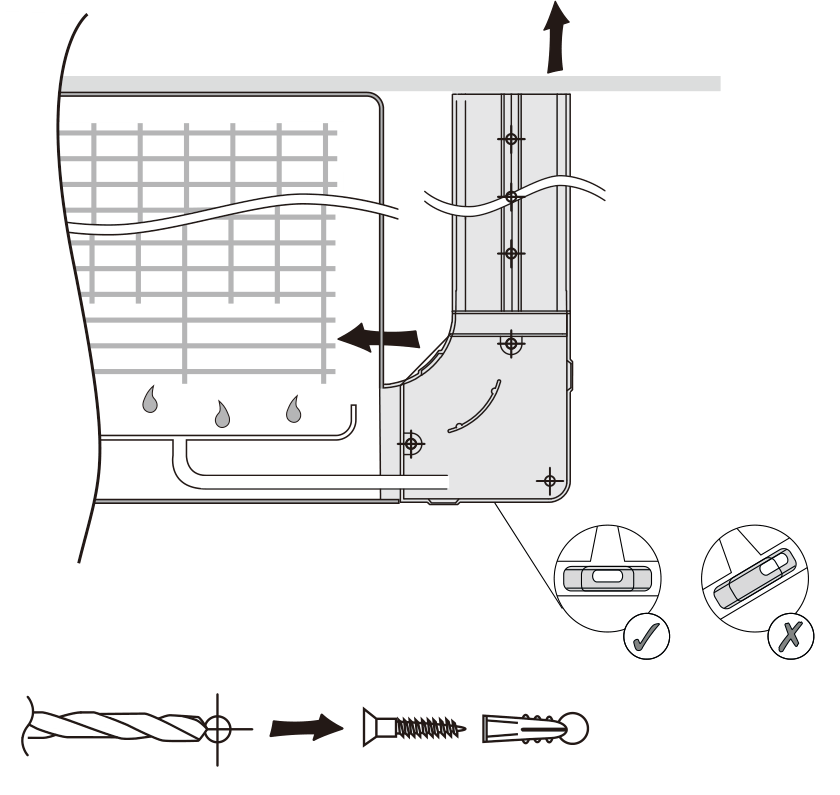
- 02Position the elbow, mark the holes and secure the elbow with wall plugs and screws. Check its alignment with a spirit level.
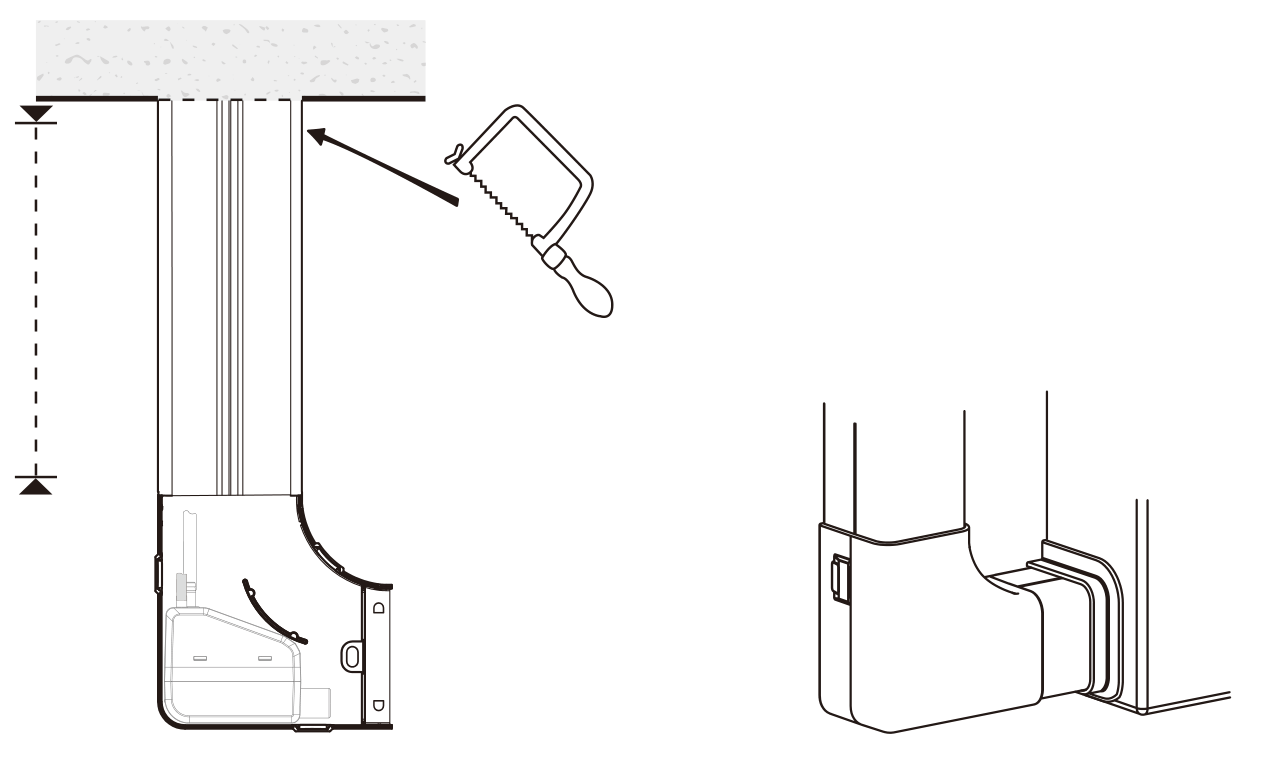
- 03Measure the required length of trunking, cut it to size and secure it.
- 04Place the pump in the elbow, secure it with a hook-and-loop strap and level the tank.
Inlet and drain hoses
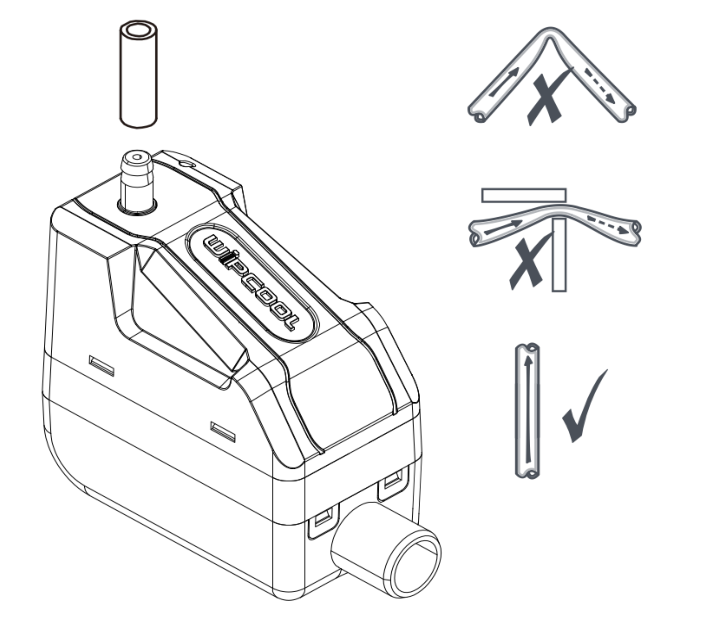
Run the drain hose in a single length without joining sections with connectors.
- 01Connect the inlet hose to the air conditioner condensate tray and the other end to the pump inlet connection so that condensate flows by gravity. Secure the connections with cable ties.
- 02Connect the 6 × 9 mm drain hose to the upper outlet connection (part 1 in Figure 2) and secure it with a cable tie. The head must not exceed 7 m.
Connection
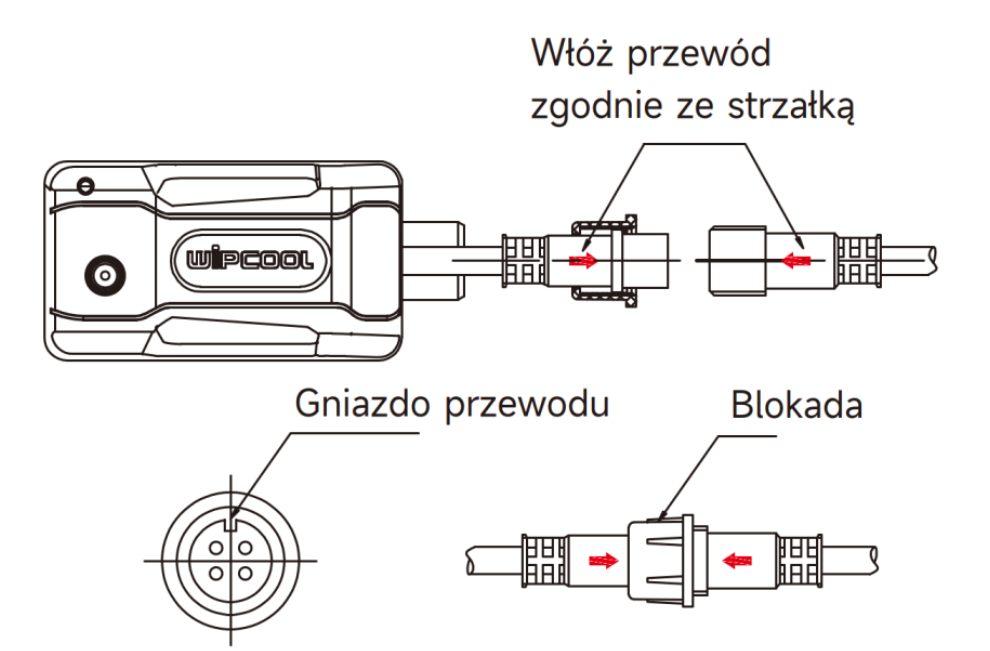
The device is protection class II; the four-core power and alarm cable contains L/N power supply cores and COM/NC alarm contact cores.
| Designation | Function | Core colour |
|---|---|---|
| L | Live core | Brown |
| N | Neutral core | Blue |
| NC | Normally closed contact | Black |
| COM | Common contact | Black |
Align the arrows on the detachable connector of the power and alarm cable, insert the plug and lock the nut.
Alarm circuit
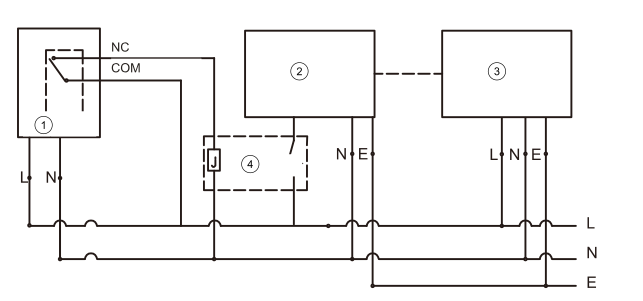
| No. | Description |
|---|---|
| 1 | Condensate pump |
| 2 | Indoor unit |
| 3 | Outdoor unit |
| 4 | Contactor |
| NC, COM | Black wires of the pump alarm contact |
Connect the COM/NC contact to the air conditioner's level sensor input or safety input. If the air conditioner does not have such an input, use a contactor to control its power supply or use an alarm device.
Interrupt the S signal wire between the indoor and outdoor units only if the air conditioner's manual permits it. The COM/NC contact is not a power supply output.
Operation
Test after installation and maintenance
- 01After checking the fixings, hoses and electrical connections, switch on the pump power supply. Pour some water into the indoor unit condensate tray.
- 02Observe the tank. At a level of approximately 15.5 mm, the pump should start, pump out the water and stop after 3 s or sooner.
- 03Repeat the test 8–10 times. Check the connections for leaks and listen to the pump during operation. The first 1–2 starts may be louder until air is removed from the system. This is not a fault.
- 04If a leak occurs or the pump does not pump out the water, stop the test and disconnect the power supply before checking the installation.
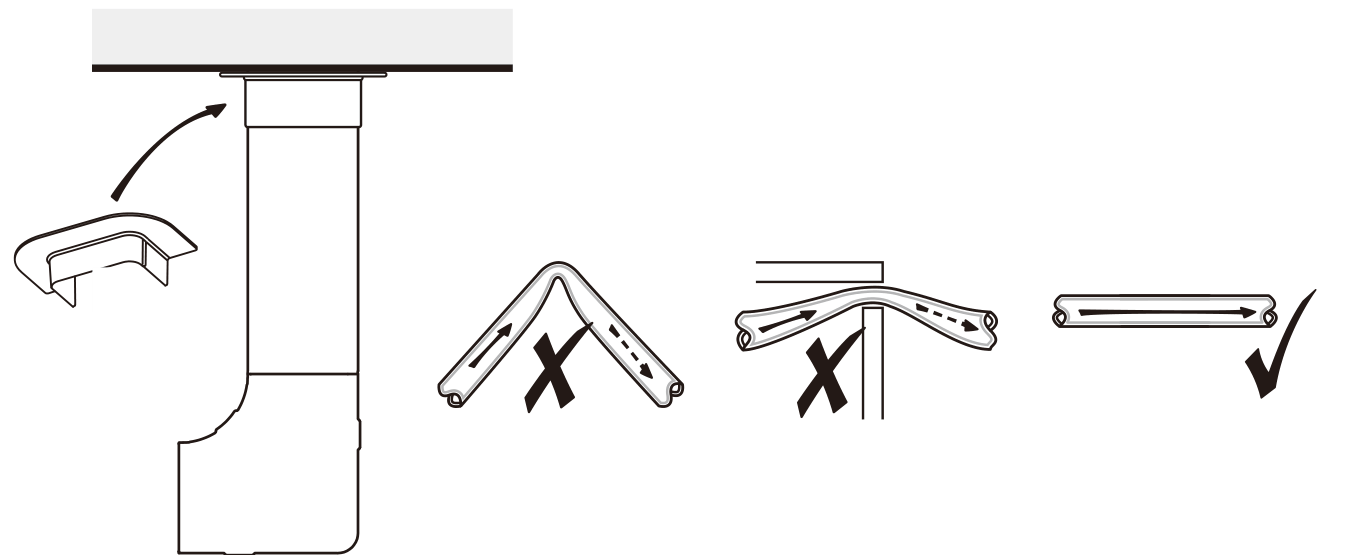
- 05For the P12CT, after a successful test, fit the trunking cover, elbow cover and wall cover. Do not crush the hoses or cables.
Automatic operation
The pump switches on and off according to the condensate level in the tank. The pump power supply must be independent of the air conditioner switching on and off so that the pump can remove any remaining condensate after the air conditioner stops.
Maintenance
General recommendations
Clean the pump before the cooling season, after it ends and before resuming operation after a break. Avoid contact between water and electrical components. Do not use alcohol, petrol, solvents, corrosive substances or strong detergents.
Cleaning the tank and mesh filter
- 01For the P12CT, remove the elbow cover. Have a towel ready for any remaining condensate and disconnect the inlet and drain hoses.
- 02Press the catch closest to the edge of the pump and slide the tank downwards.
- 03Wash the inside of the tank with water and mild soap. Clean the mesh filter and the accessible surface of the level sensor, then rinse them with clean water.
- 04Insert the mesh filter into the tank, align the tank catches with the grooves and snap it into place. Connect the hoses and secure the connections with cable ties.
- 05Connect the power supply and perform the test described in the ‘OPERATION’ section.

Disconnect the pump from the power supply when cleaning the air conditioner with chemicals. Before reconnecting it, flush away any cleaning agent residue to prevent it from entering the pump.
Troubleshooting
After correcting the cause, perform the test described in the ‘OPERATION’ section.
| Problem | Possible cause | Solution |
|---|---|---|
| Pump does not operate | No power supply | Check the power supply connection. |
| Pump does not operate | Incorrectly connected wires | Check the core connections against the table in the ‘CONNECTION’ section. |
| Pump does not operate | Incorrect voltage | Check that the voltage matches the rating plate. |
| Pump does not operate | Tank is not level | Level the tank and check the water level. |
| Pump runs continuously | Tank is not level | Level the tank. |
| Pump runs continuously | Deposits inside the tank | Clean the inside of the tank and the accessible surface of the level sensor. |
| Pump runs but does not drain water | Blocked inlet or outlet | Check and clean the inlet and outlet. |
| Pump runs but does not drain water | Tank is not level | Level the tank. |
| Water leaks | Damaged drain hose | Check the hose and replace it if damaged. |
| Water leaks | Incorrect hose connection | Correct and secure the hose connection. |
| Pump operates noisily | Damage to internal components | Arrange for repair by the service centre - submit a request at wipcool.pl/serwis. |
| Pump gurgles or makes noise after switching off | The end of the drain hose is lower than the pump, causing a siphoning effect | Route the hose so that its end is higher than the pump. |
| Pump switches on and off too frequently | Excessive condensate inflow | Check that the condensate inflow does not exceed the pump maximum flow rate (12 l/h). |
| Pump switches on and off too frequently | Tank is not level | Level the tank. |
| Connected alarm activates | Condensate level too high | Check that the inlet is clear and condensate is draining. |
| Connected alarm activates | Problem with alarm connection | Check the COM/NC core connections. |
Waste electrical and electronic equipment
- 01The crossed-out bin symbol means that the device must not be disposed of with other waste at the end of its life.
Under applicable waste electrical and electronic equipment regulations, products marked with the separate collection symbol must not be disposed of with other municipal waste. Because they contain harmful substances, electronic products that are not collected separately may pose a risk to the environment and human health. Proper separate collection of waste electrical and electronic equipment prevents negative effects on the environment.
By taking waste equipment to a collection point, the user contributes to its reuse, recycling and recovery.
Recycling - a method of protecting the environment. The process of recovering substances from waste that can be reused as raw materials.
Waste recovery - the use of waste that has lost its useful value, such as plastics, paper and cardboard, as secondary raw materials (also commonly used to mean its destruction).
Information on the waste electrical and electronic equipment collection system
- ■Waste electrical and electronic equipment must not be disposed of with other waste.
- ■The collection of incomplete electrical and electronic equipment and parts from waste equipment is prohibited.
- ■A distributor delivering equipment intended for households to a buyer must collect waste household equipment free of charge at the place of delivery, provided that the waste equipment is of the same type and performs the same function as the equipment supplied.
- ■The user may hand over waste equipment to a waste equipment collector, a treatment facility or a municipal waste collector in the municipality.
- ■Information about collection points is available on the BIP public information websites of regional, city and municipal offices.
Service and documents
Before submitting a request, prepare:
- ■Model - found on the device rating plate and on the invoice.
- ■Serial number - if there is none, provide the production number (e.g. 11/2025), usually found on the underside of the device.
- ■Proof of purchase - an invoice or receipt from an authorised distributor.
- ■Description of the fault - what is happening, when it started and under what conditions.
Submit a service request at wipcool.pl/serwis. The warranty terms are also available there.